How to Make a Origami Bowling Pin
This post may contain affiliate links. Read my disclosure policy here.
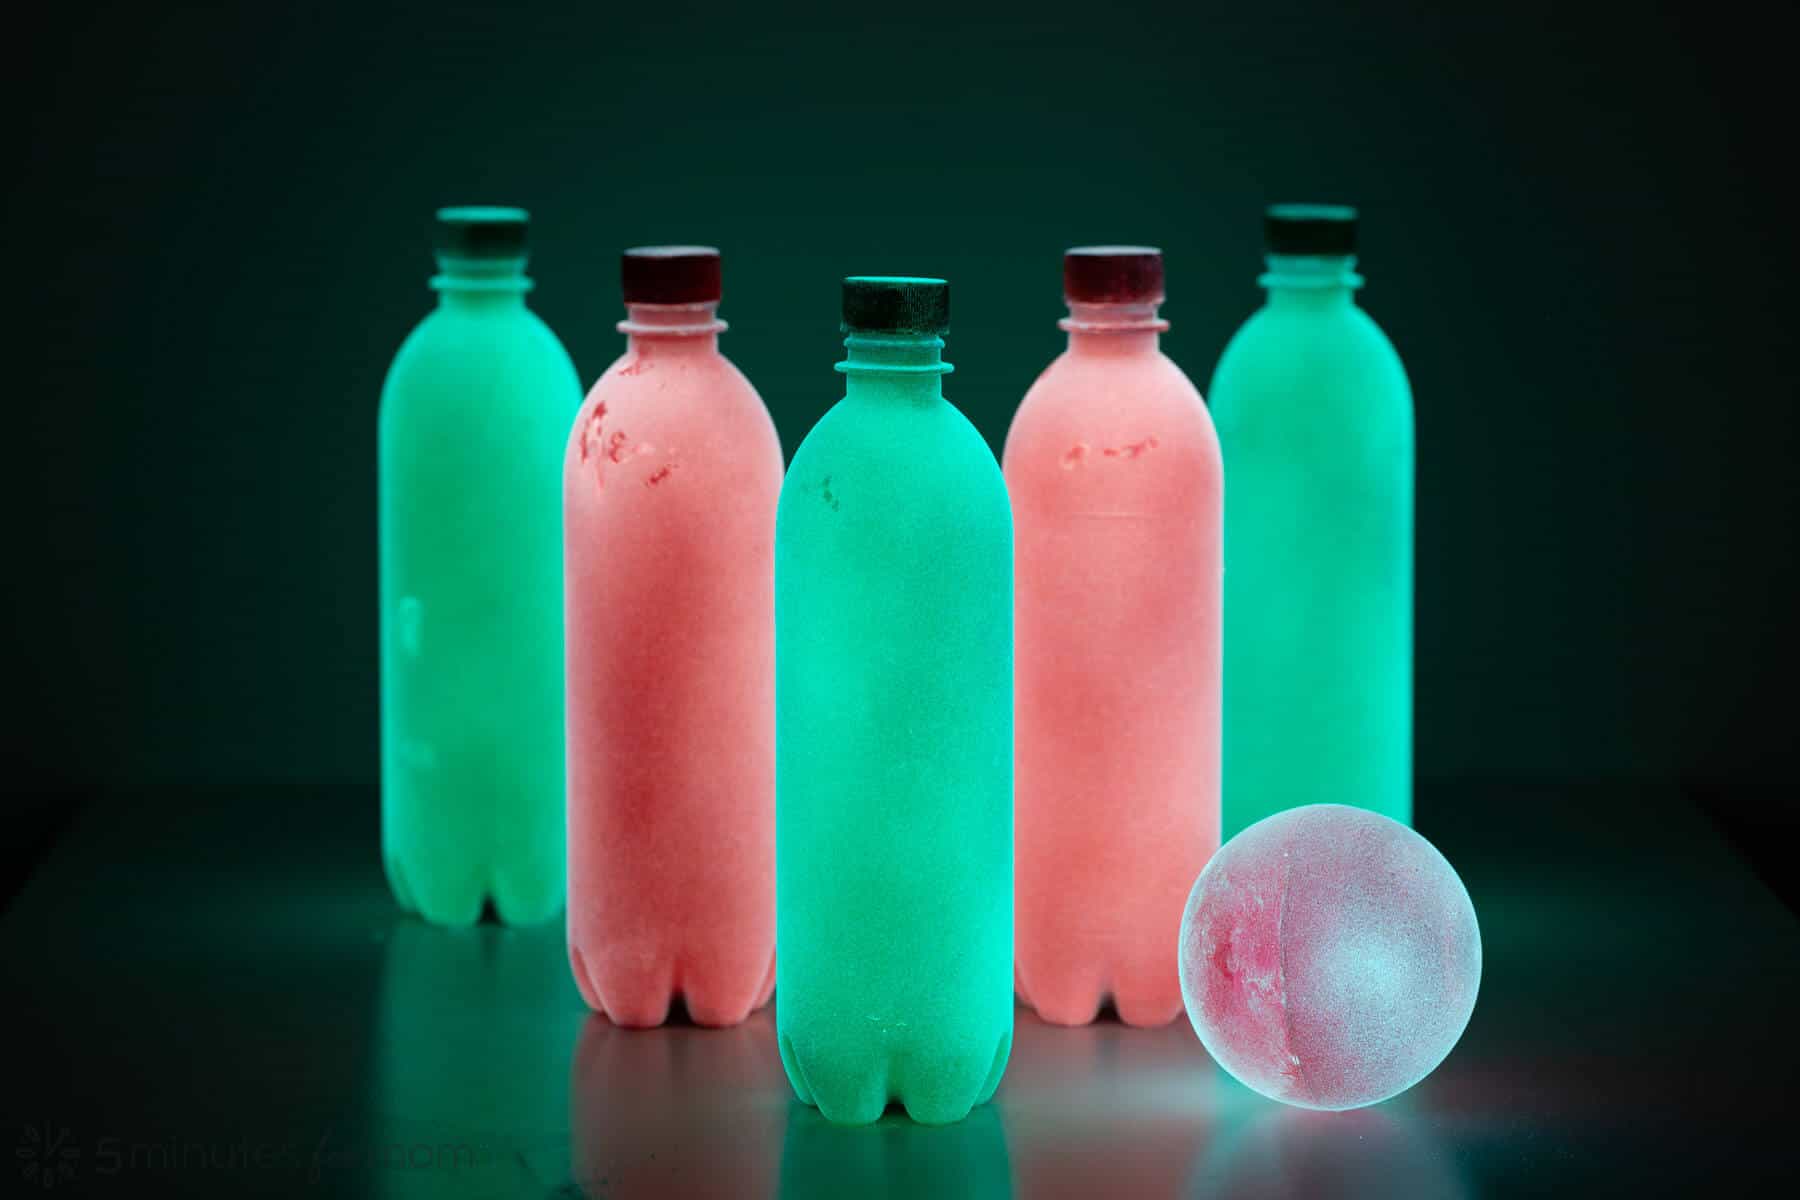
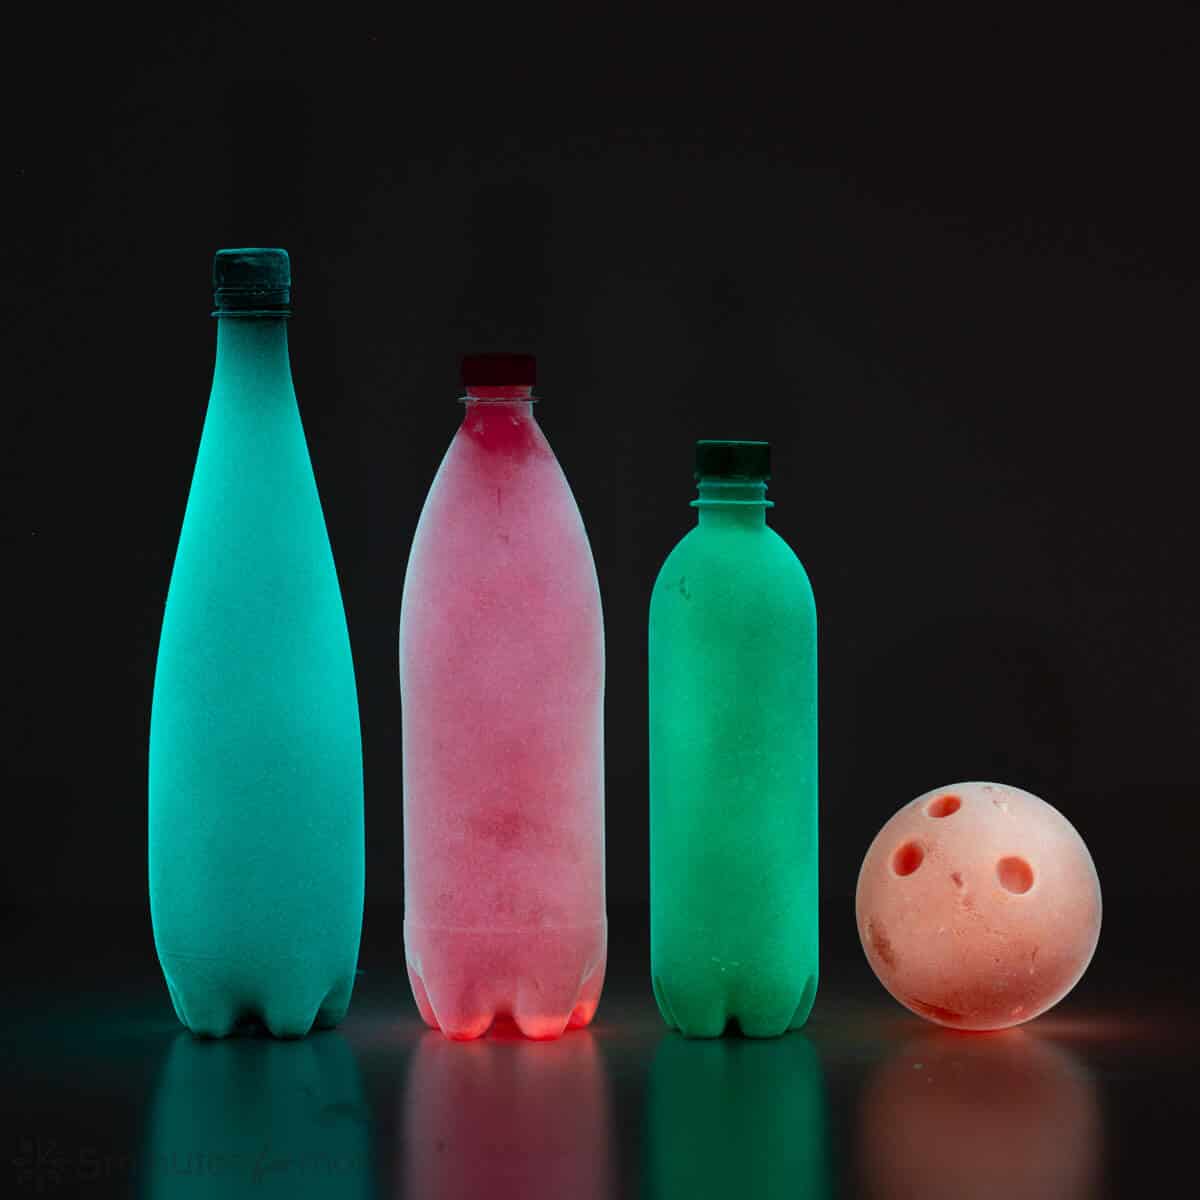
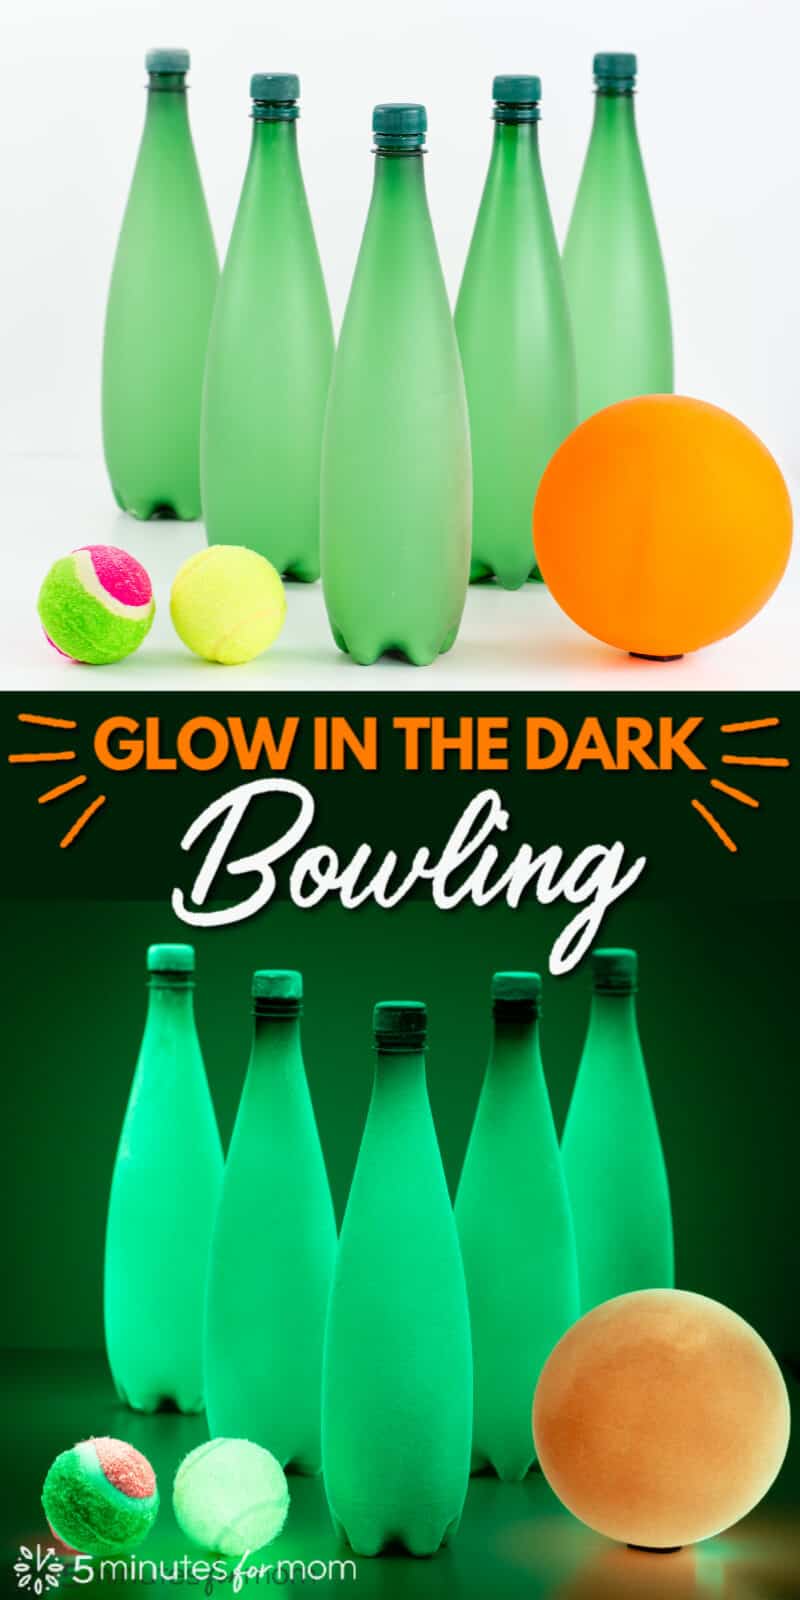
Glow in the dark bowling is a fun game to get kids of all ages playing together and you can easily create your own glowing bowling pins. In this step-by-step tutorial, we will show you three different ways to make a DIY glow in the dark bowling set.
You and your kids (even teenagers) will love this latest DIY in our ongoing sponsored partnership with Testors.com.
Looking for some creative ideas to get your kids off the couch this spring break?
 We're thrilled to host another Testors Crafternoon to show you how to make these awesome homemade bowling pins.
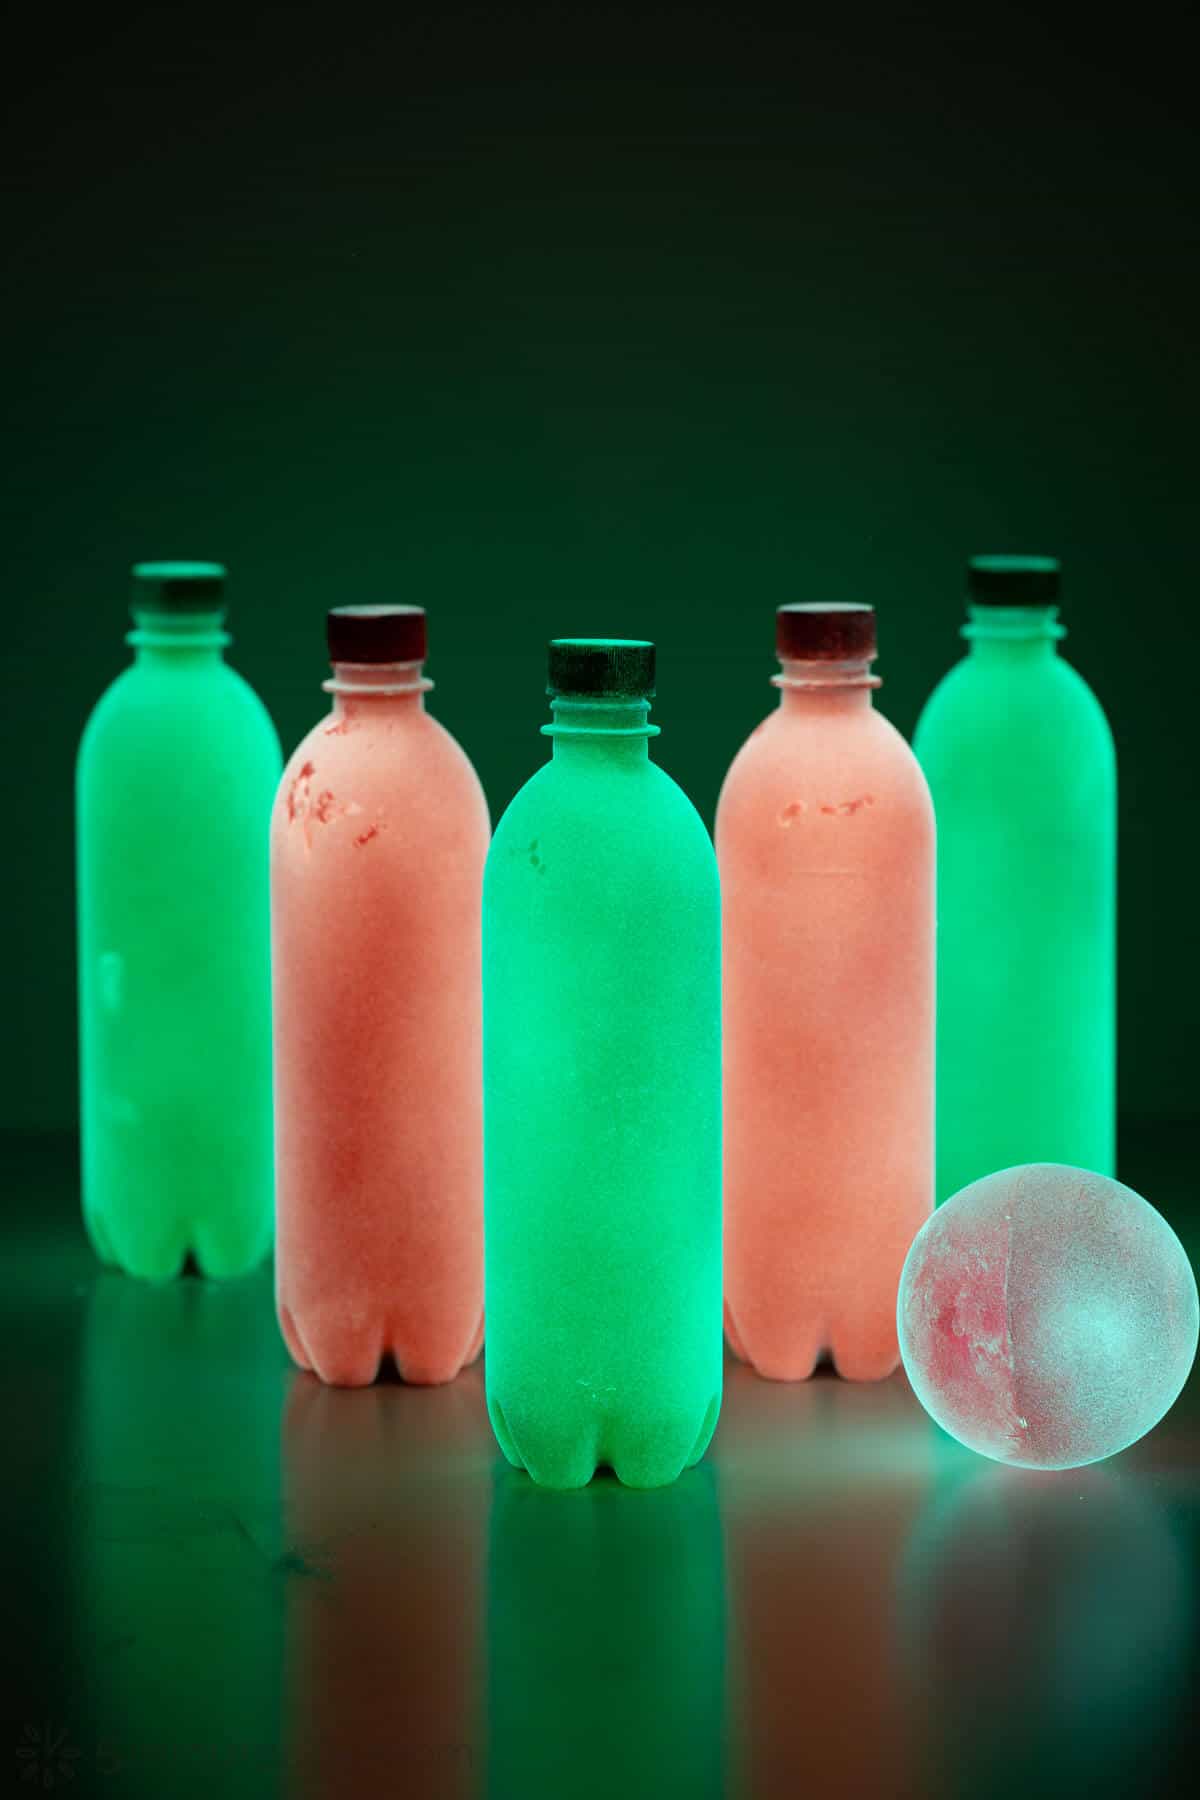
With these DIY Glow in the Dark Bowling sets you and your kids can have double the fun! During the day, you can spend some time crafting together and enjoy the DIY magic of making your glowing bowling pins and bowling balls. Then you can turn out the lights (or wait until the dark of night) and start your second round of fun… knocking down all those pins in your new homemade bowling alley.
In this DIY tutorial, we cover three different methods for how to make DIY glow-in-the-dark bowling pins.
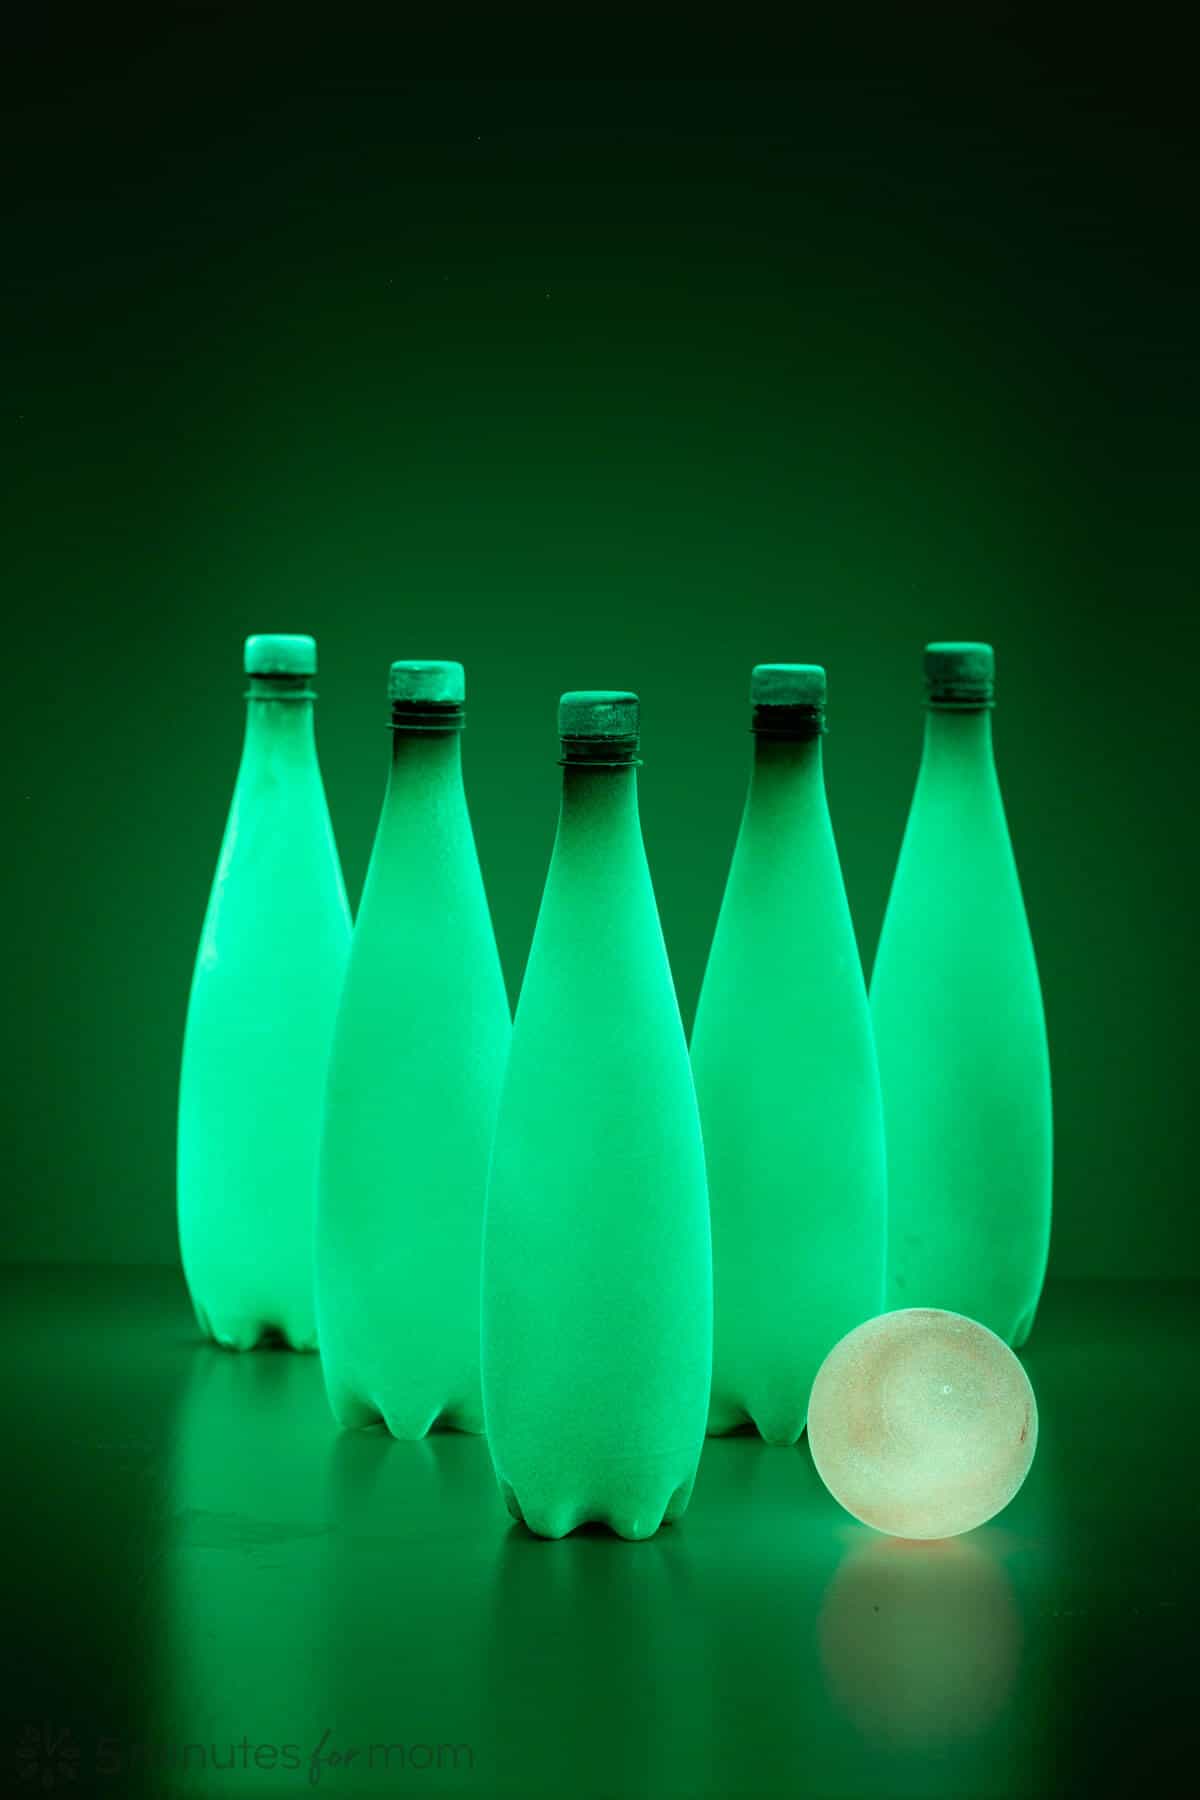
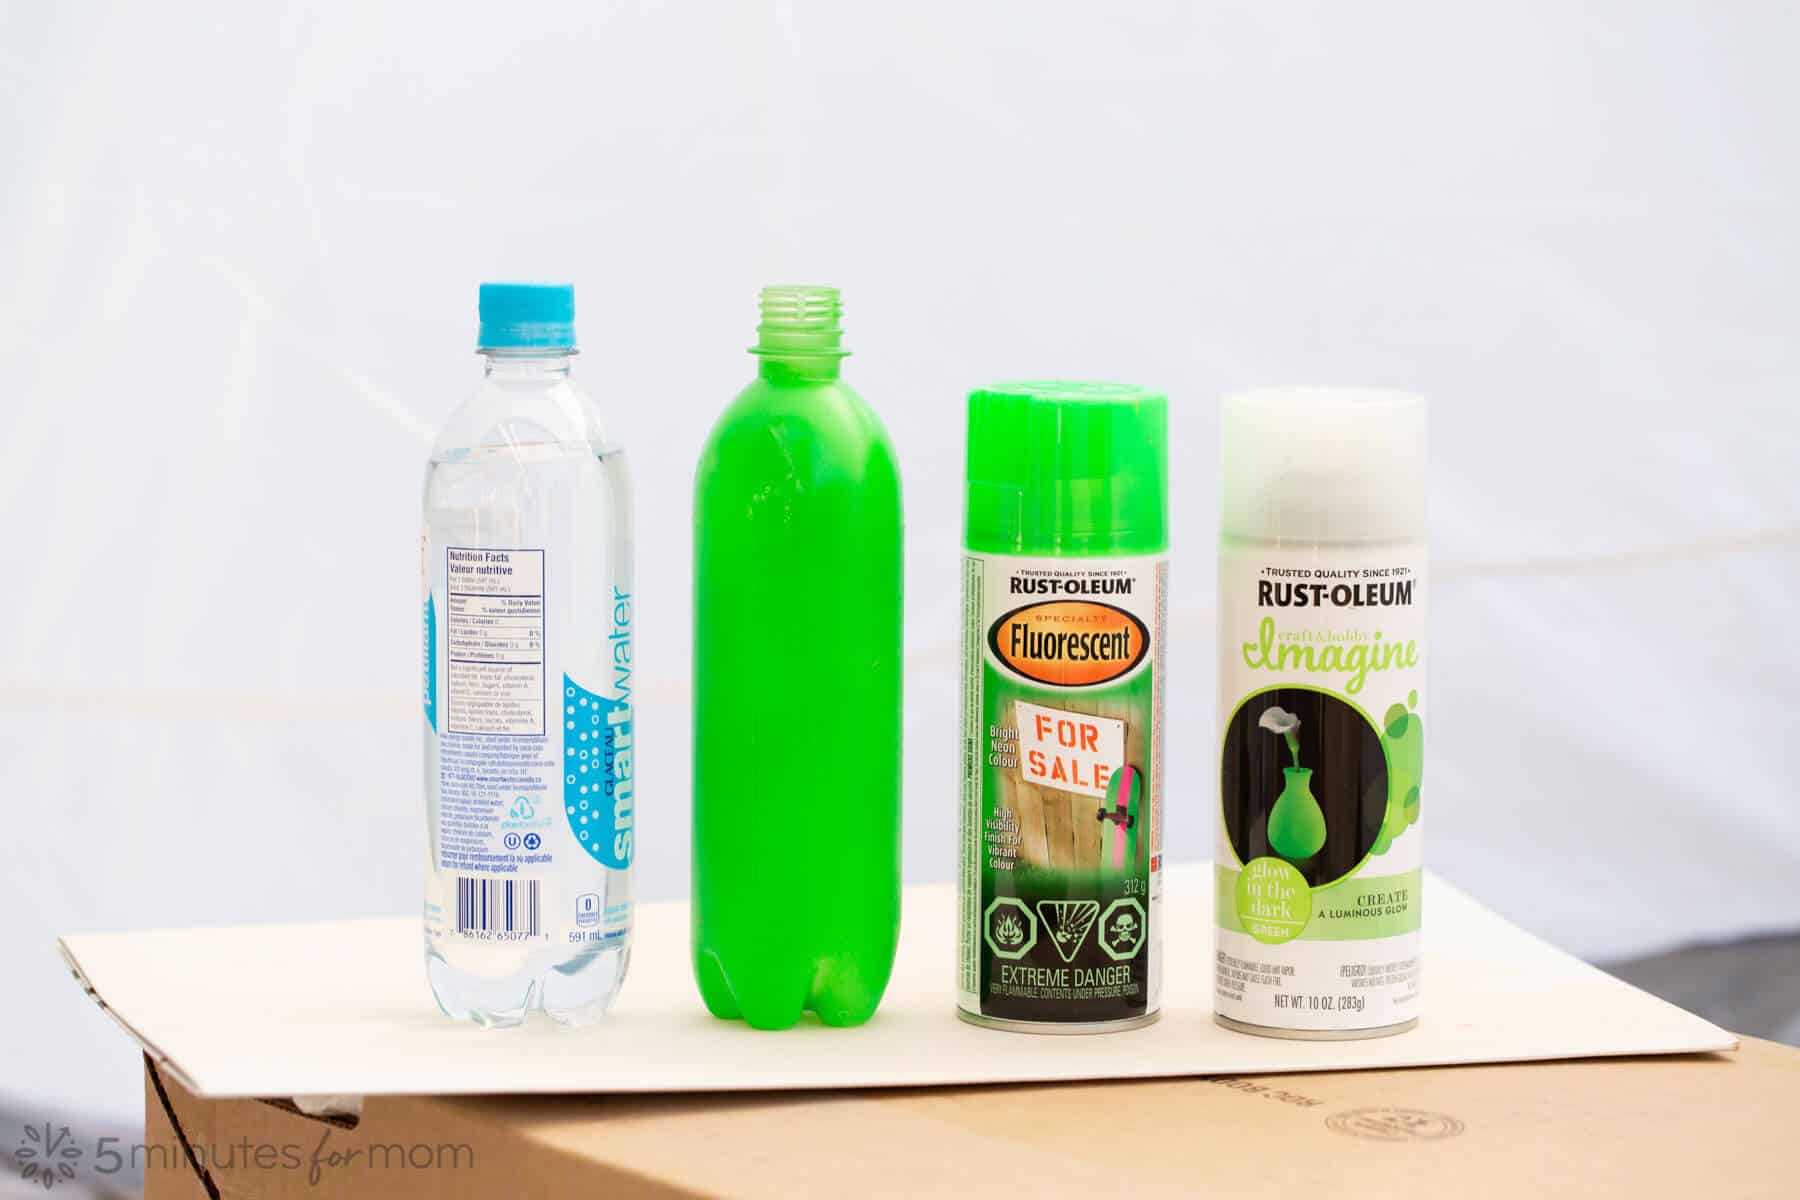
To make these fabulous night games, you only need to grab some plastic water bottles from the recycling bin and some Rust-Oleum Imagine Glow in the Dark Spray Paint OR some Testors Craft Acrylic Glow Paint.
You can find Rust-Oleum paints at many different stores and online at joann.com. Testors Craft paints are also available at a variety of craft stores and online at truevalue.com.
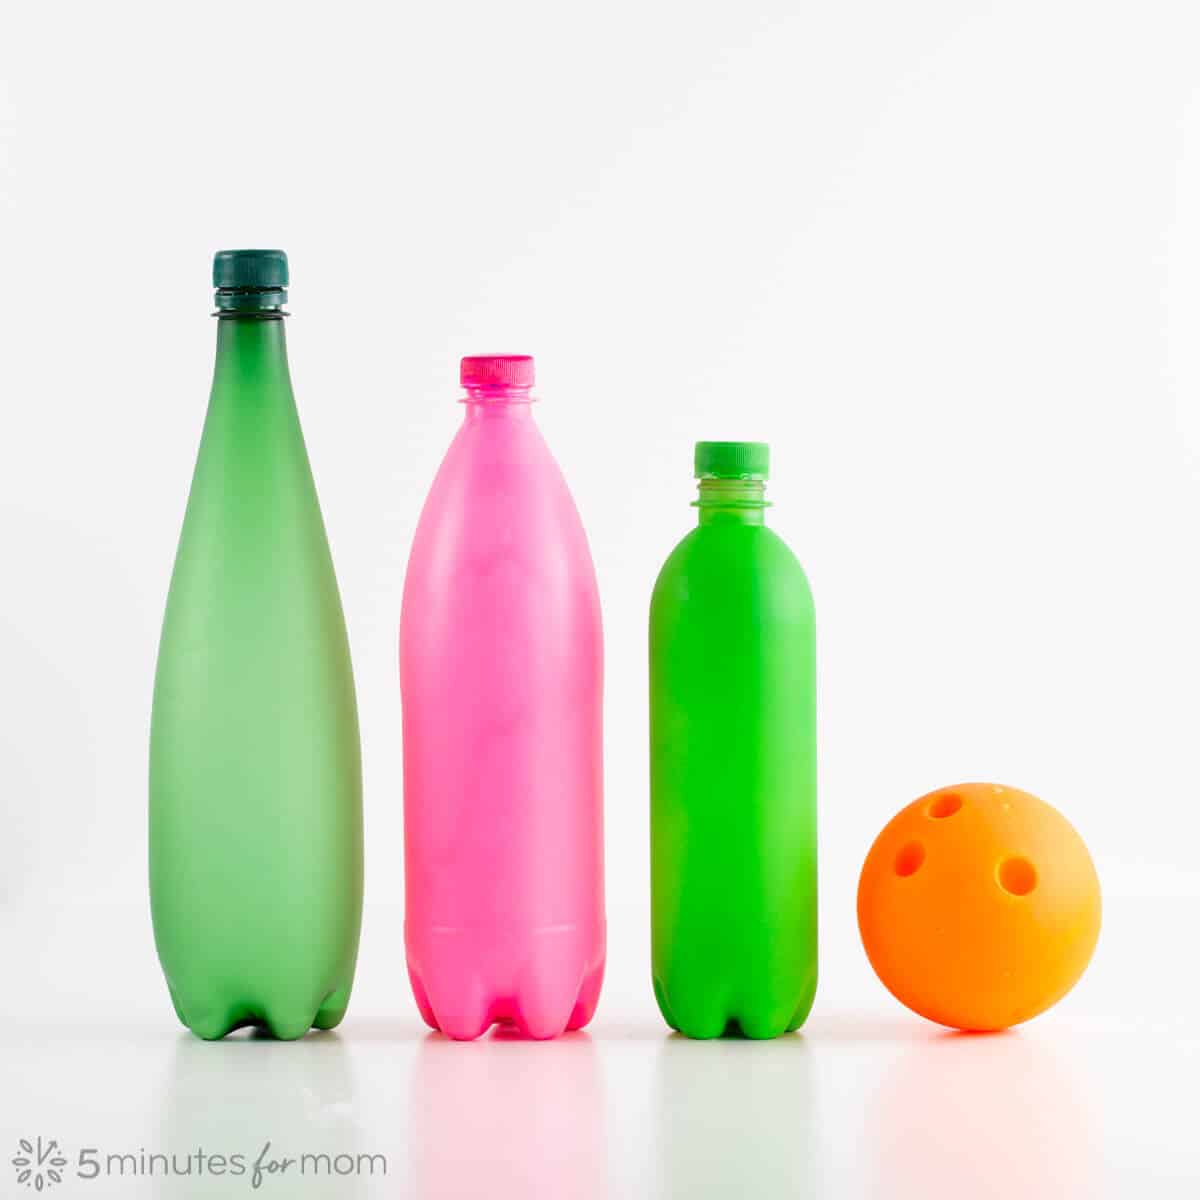
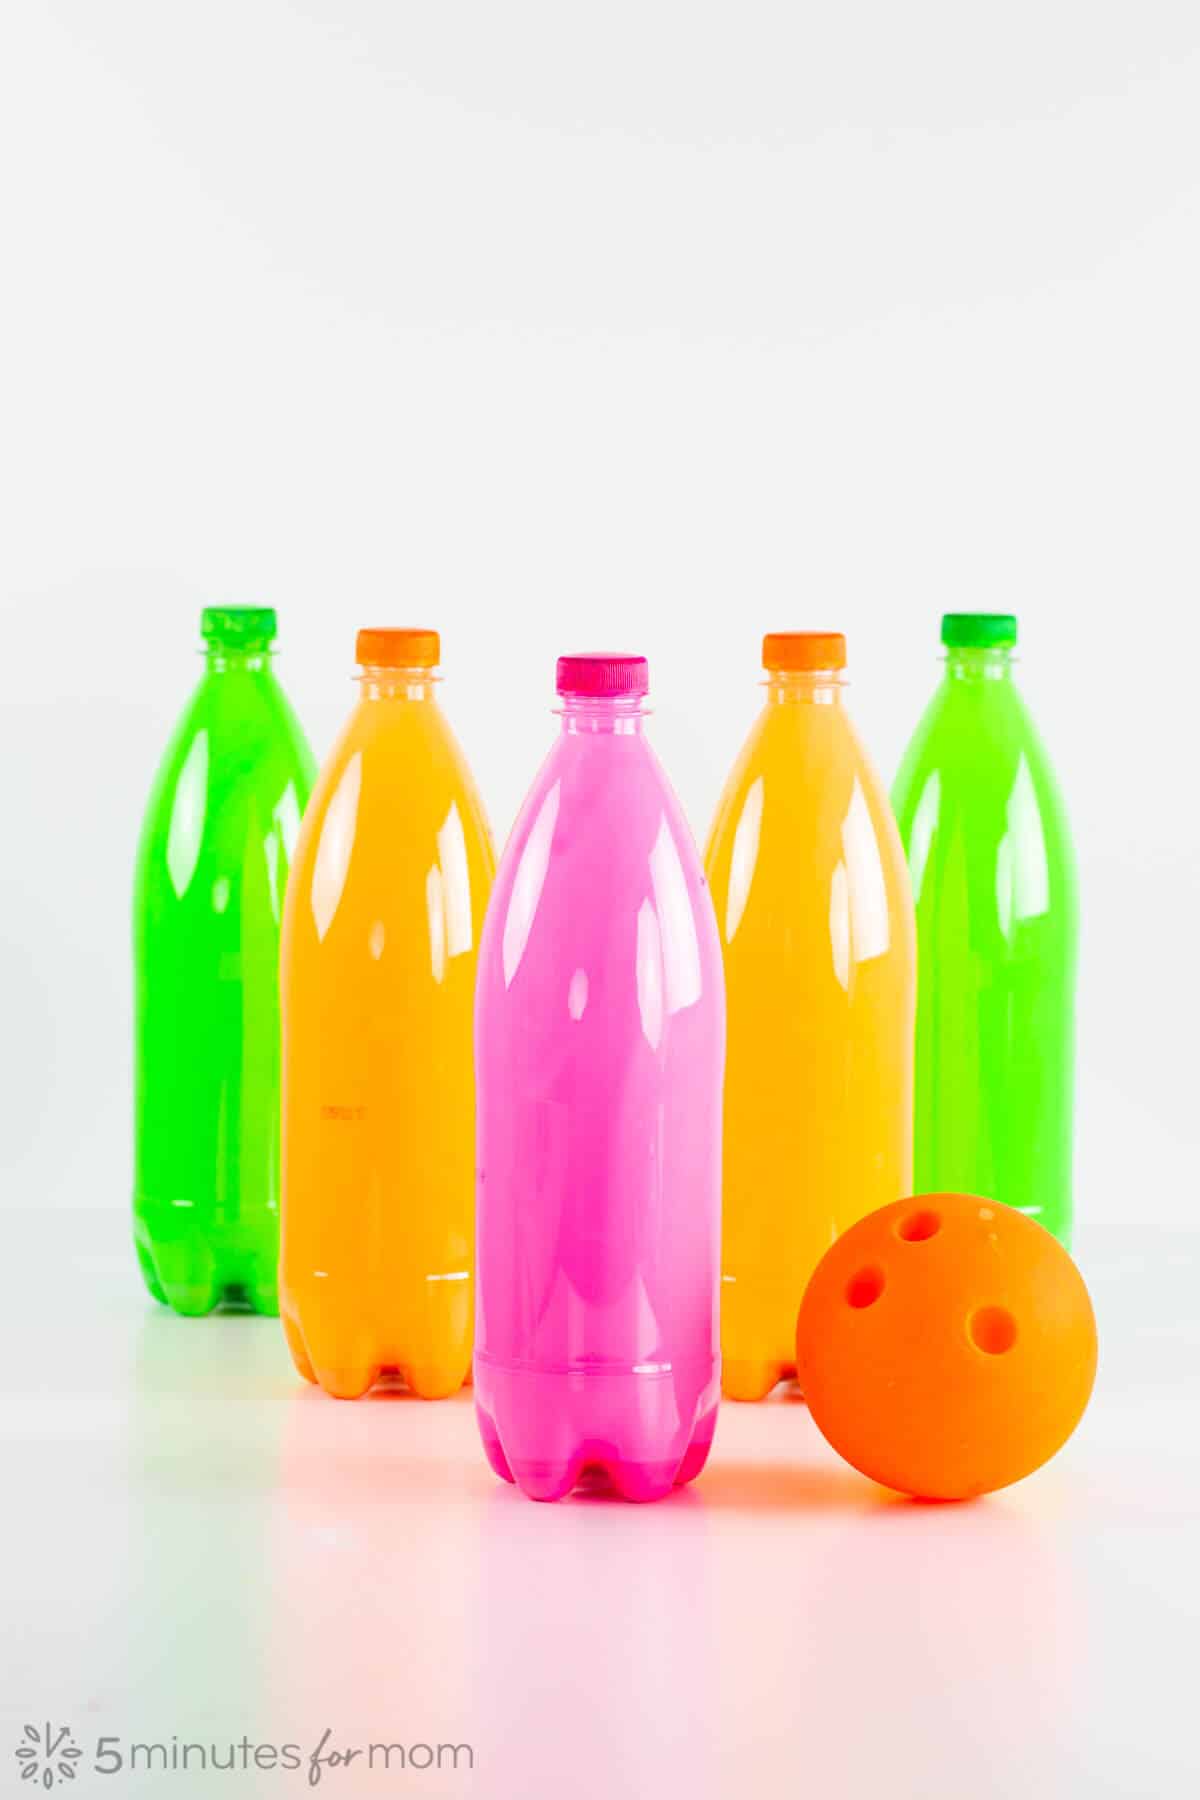
We made five-pin bowling pin sets, but you can make ten-pin bowling sets if you prefer.
You can keep on bowling, night after night…
Perhaps the best part of these Night Bowling DIY methods is that they do NOT use glow sticks which can only be used once.
These glow in the dark bowling pins are all reusable – just expose to light for an hour or two to recharge.
Glow in the dark bowling is great for all ages. Our kids are tweens and teenagers now and they have had a blast with our night bowling games at home. Yes – this is a game that my eighteen-year-old son and my twelve-year-old daughter have fun playing together!
Night bowling is also a perfect game for youth groups and parties. So, if you are looking for an inexpensive, easy family or party game, this DIY is for you.
You can bowl in the dark outside or just turn off the lights inside for an indoor glow-in-the-dark bowling game.
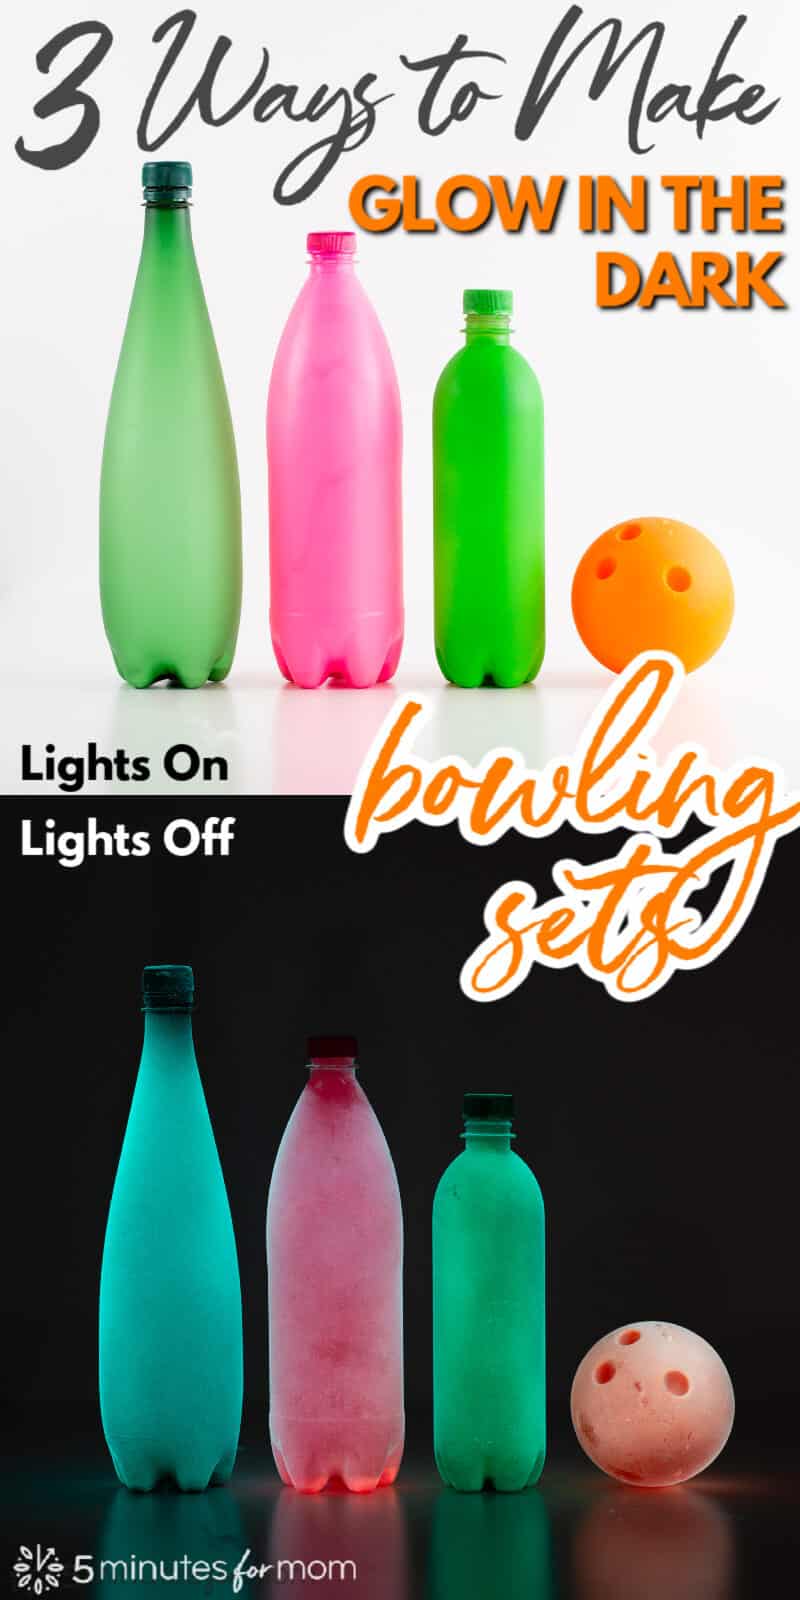
Read on for the details on how to make our three different versions of DIY Glow in the Dark Bowling Sets using glow in the dark paint.
(Tip: if you have young kids, method number three might be the perfect one for you.)
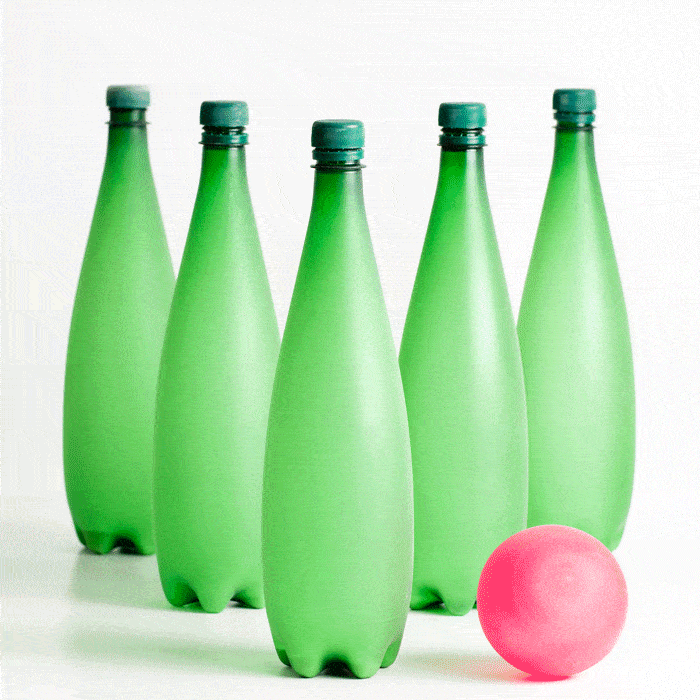
1st Method — Spray Paint Glow in the Dark Bowling Pins
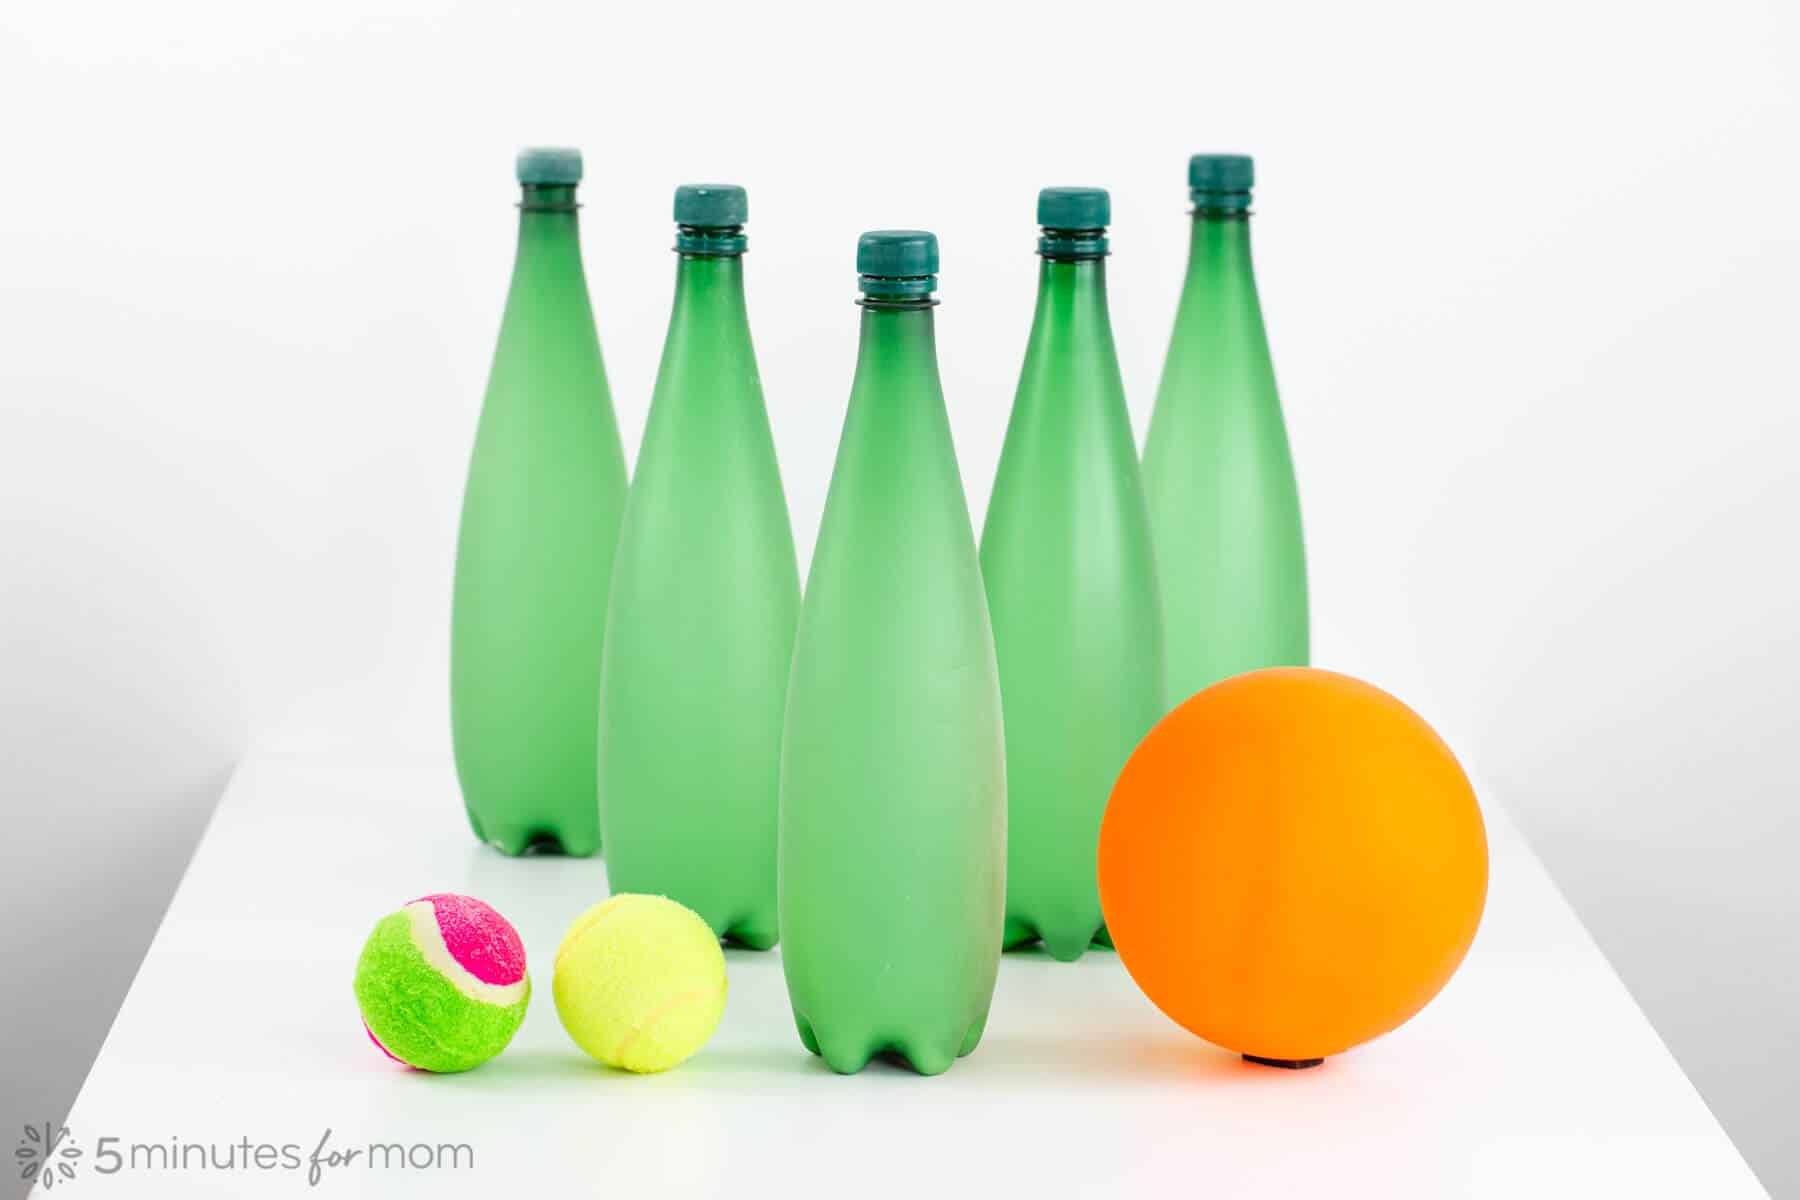
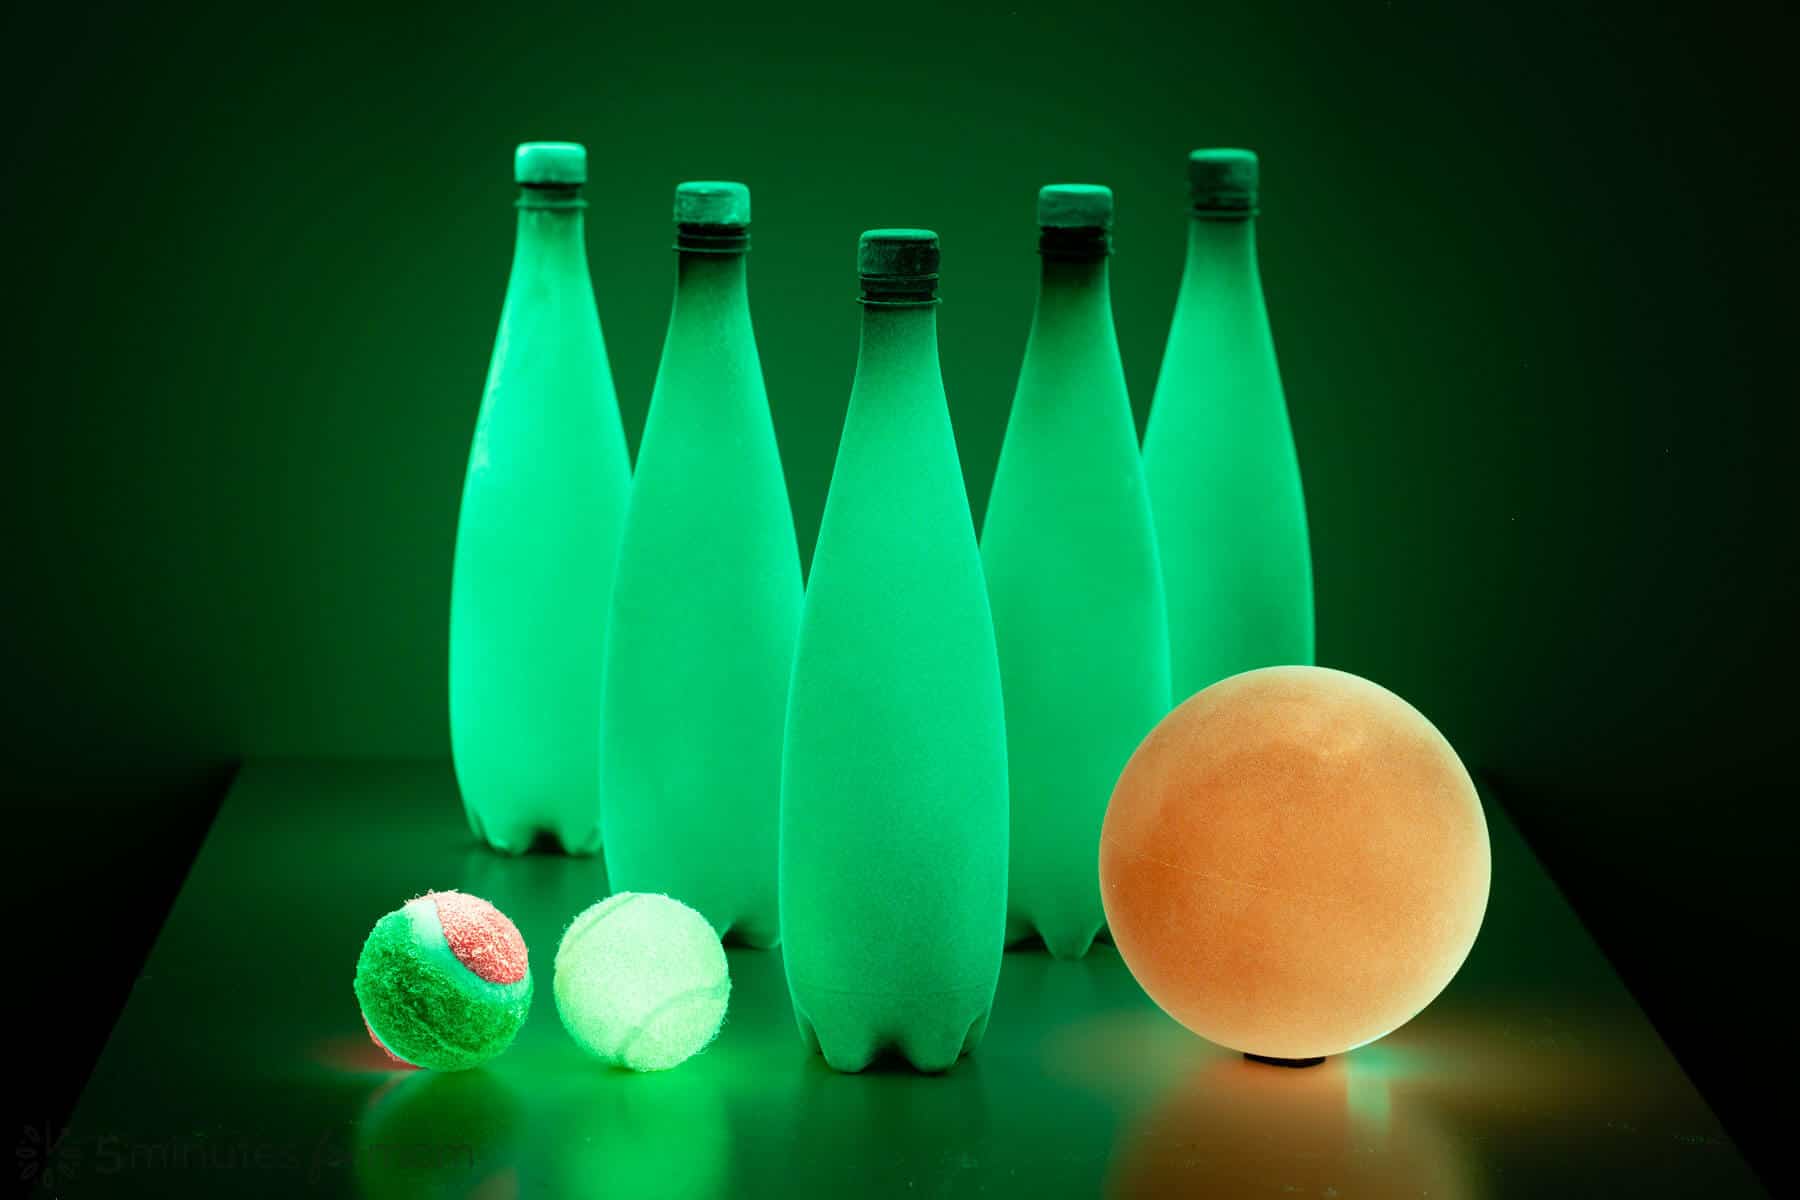
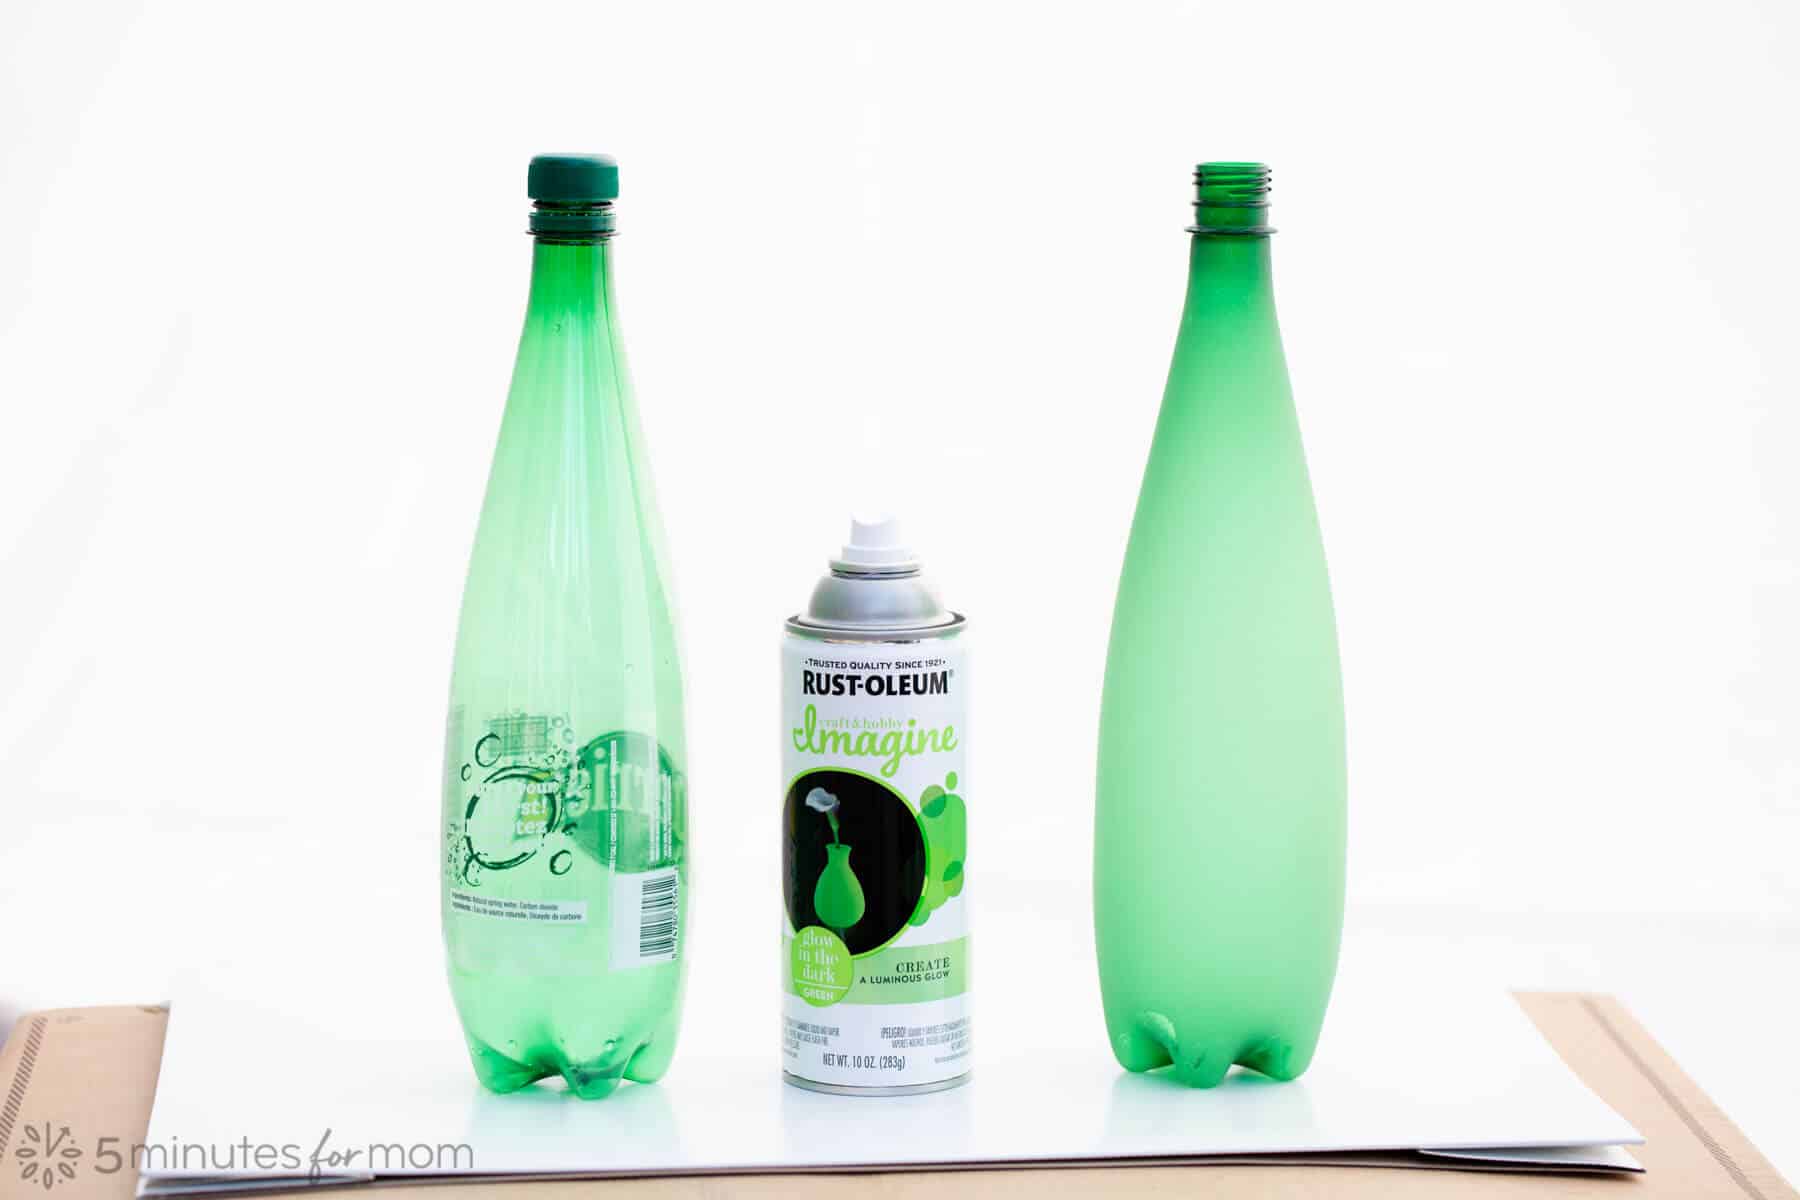
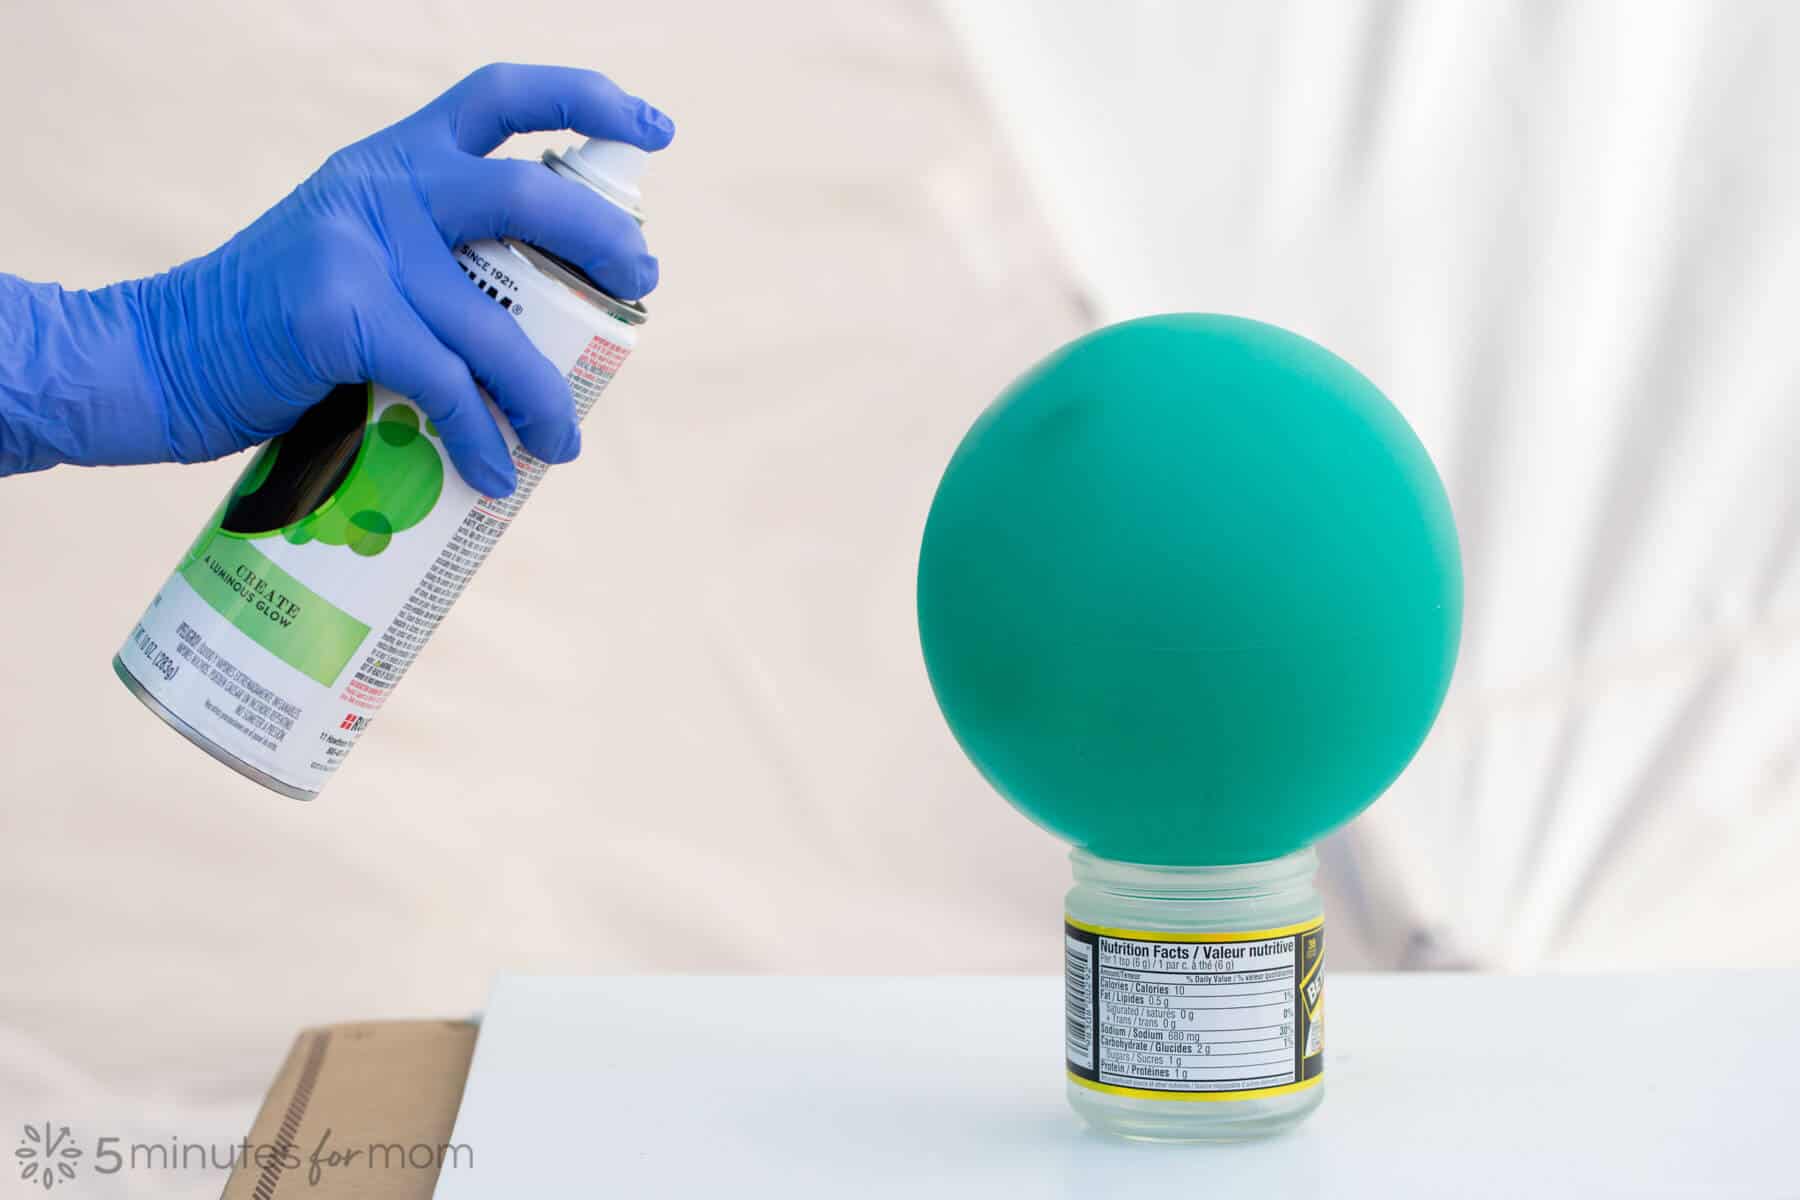
Our first method for making glow-in-the-dark bowling pins is so simple all it requires are plastic Perrier bottles, a toy ball or tennis ball, and a can of Rust-Oleum Glow in the Dark Spray Paint.
1st Method Supplies:
- Plastic Perrier Bottles
- Ball(s) – your choice of rubber/plastic/bouncy/tennis balls
- Rust-Oleum Imagine Glow In The Dark Spray Paint (Find it at Joann Stores and online at joann.com.)
- (optional) Testors Craft Glitter Sealer or Rust-Oleum Imagine Glitter Clear Sealer or Rust-Oleum 2X Ultra Cover Clear Spray
1st Method Instructions:
- Remove labels and wash the plastic bottles with soapy water. To ensure the outside of the bottle is extra clean with no fingerprints or grease, you can also wash the outside of the bottle with vinegar or rubbing alcohol.
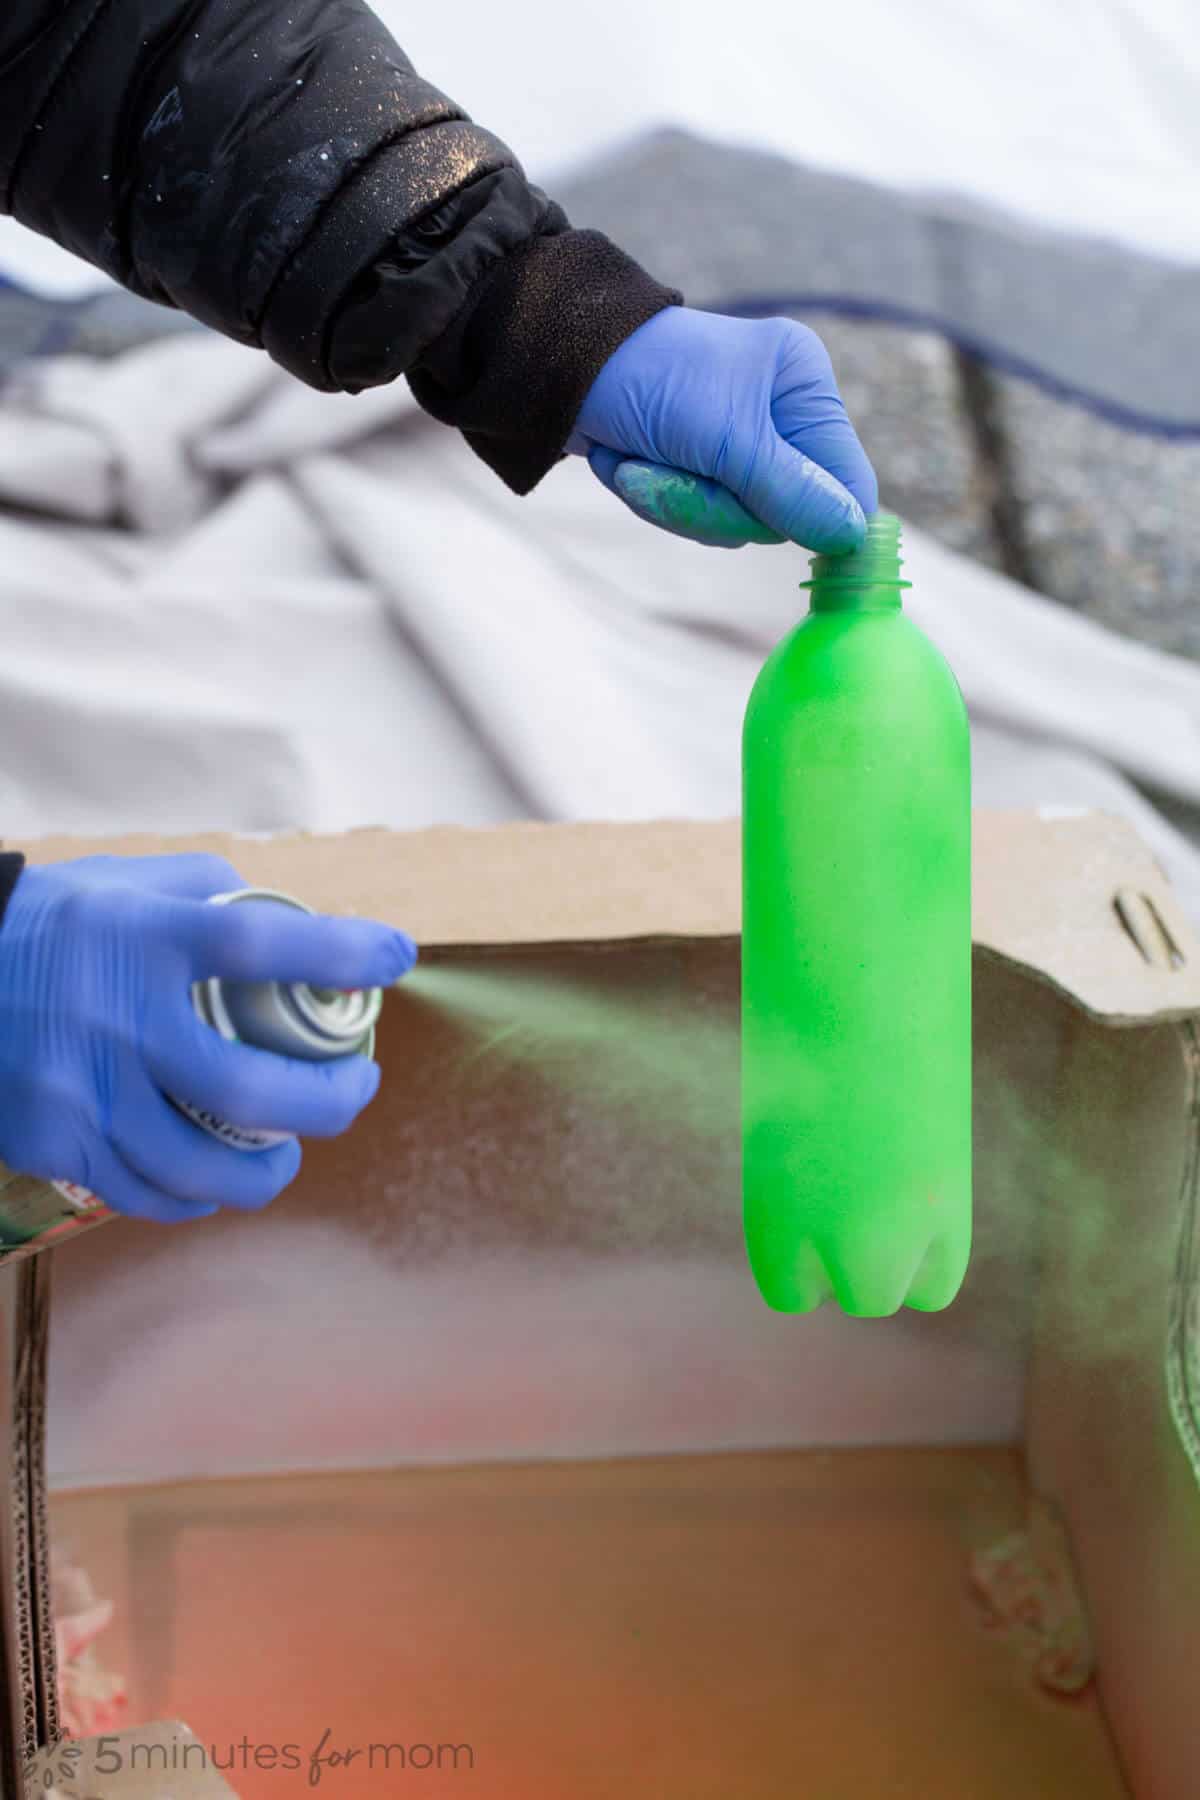
- Outside, in a well-ventilated area that is protected from over-spray, spray bottles with light coats of Rust-Oleum Imagine Glow In The Dark Spray Paint. Spray each coat lightly, waiting a few minutes before adding additional coats.

The more coats you apply, the brighter your bowling pins will glow.
You may want to remove the bottle lids to easily hold the bottle while spray painting and then spray the lids separately. Alternatively, you can return the lids once the bottles are dry and spray paint the lids while they are on the bottles.
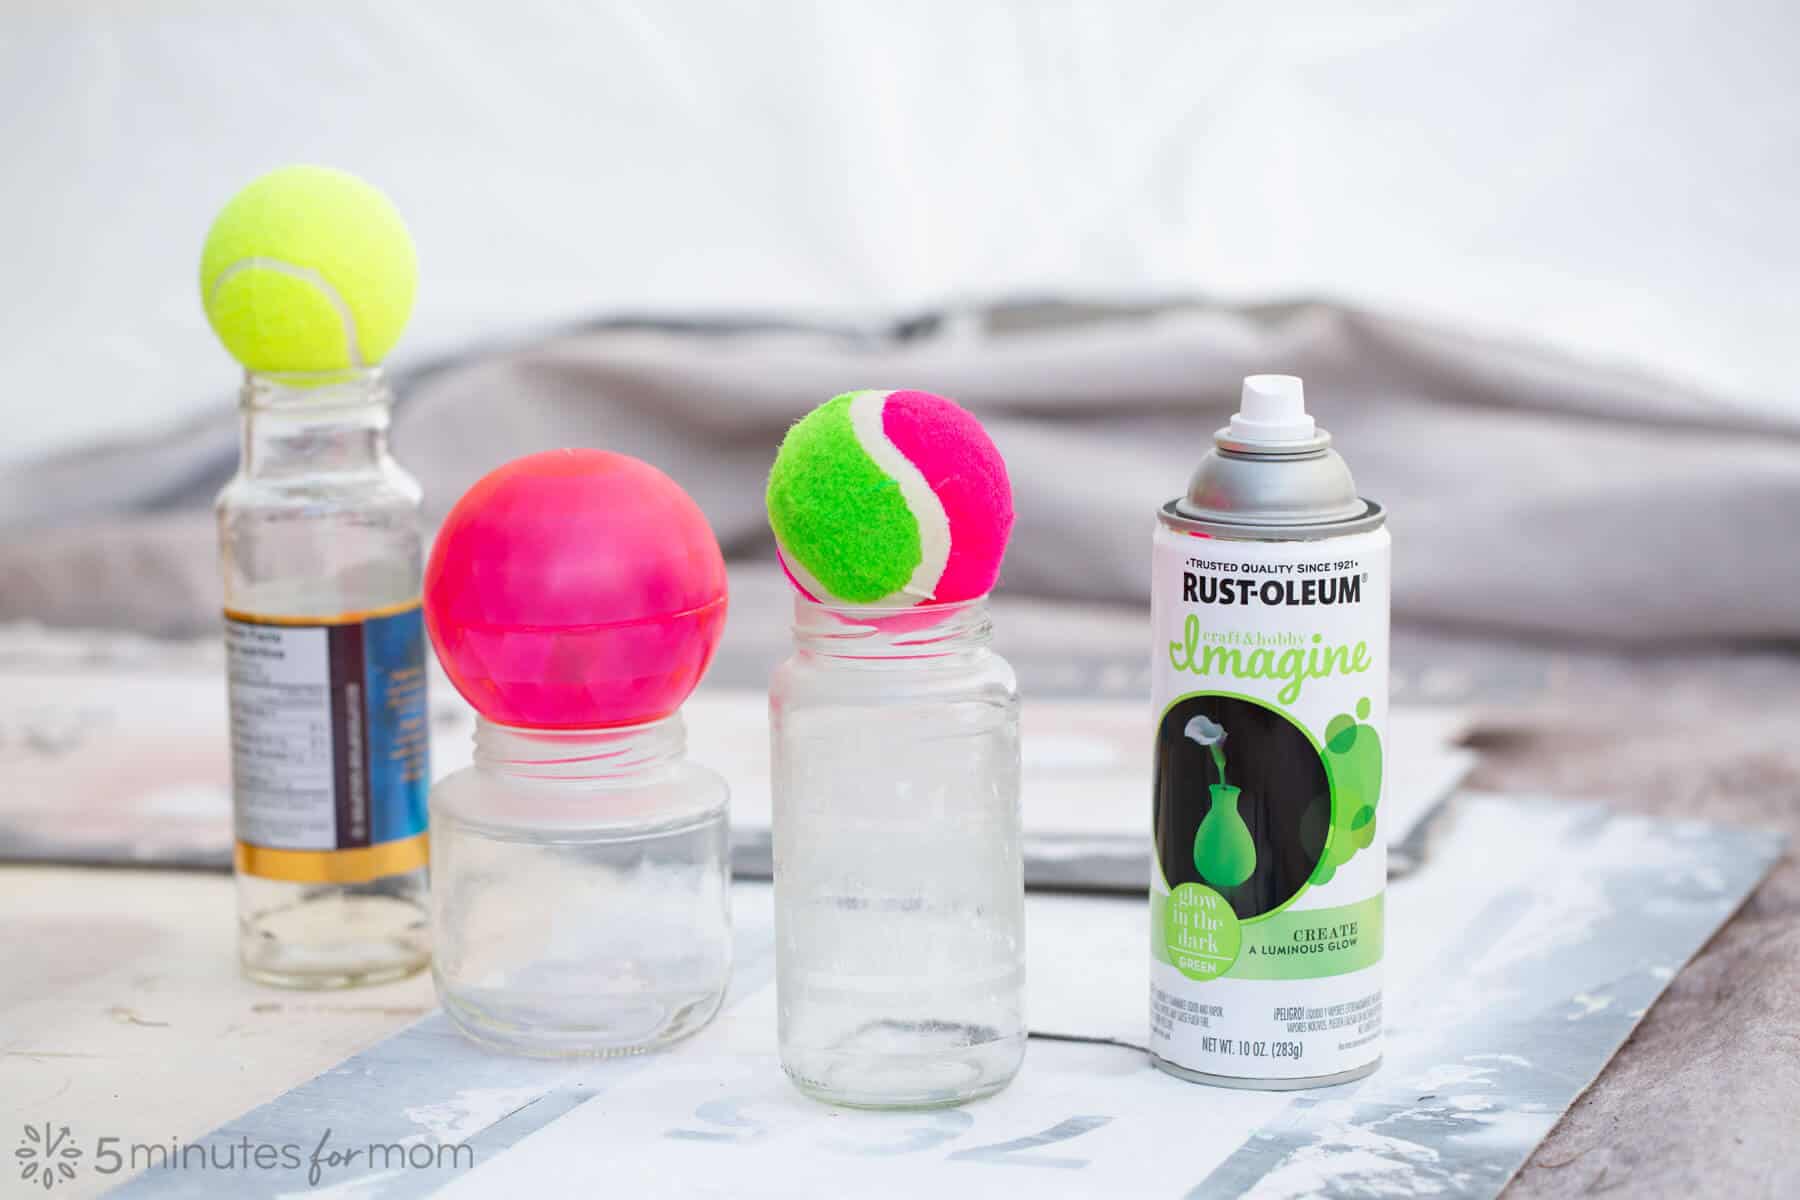
- To make your bowling balls glow, you will also want to spray them with the Rust-Oleum Imagine Glow In The Dark Spray Paint. We used empty glass jars from our recycling bin to hold the balls while we sprayed. Allow the paint to dry before turning the ball to paint the underside.
- (Optional) Once glow in the dark paint is dry, apply a protective topcoat or glitter sealer, such as Testors Craft Glitter Sealer or Rust-Oleum Imagine Glitter Clear Sealer or Rust-Oleum 2X Ultra Cover Clear Spray. The glow in the dark paint can sometimes rub off slightly when playing, so applying a topcoat, especially on your bowling balls, will keep your hands and your house from getting a trace dusting of glow paint.
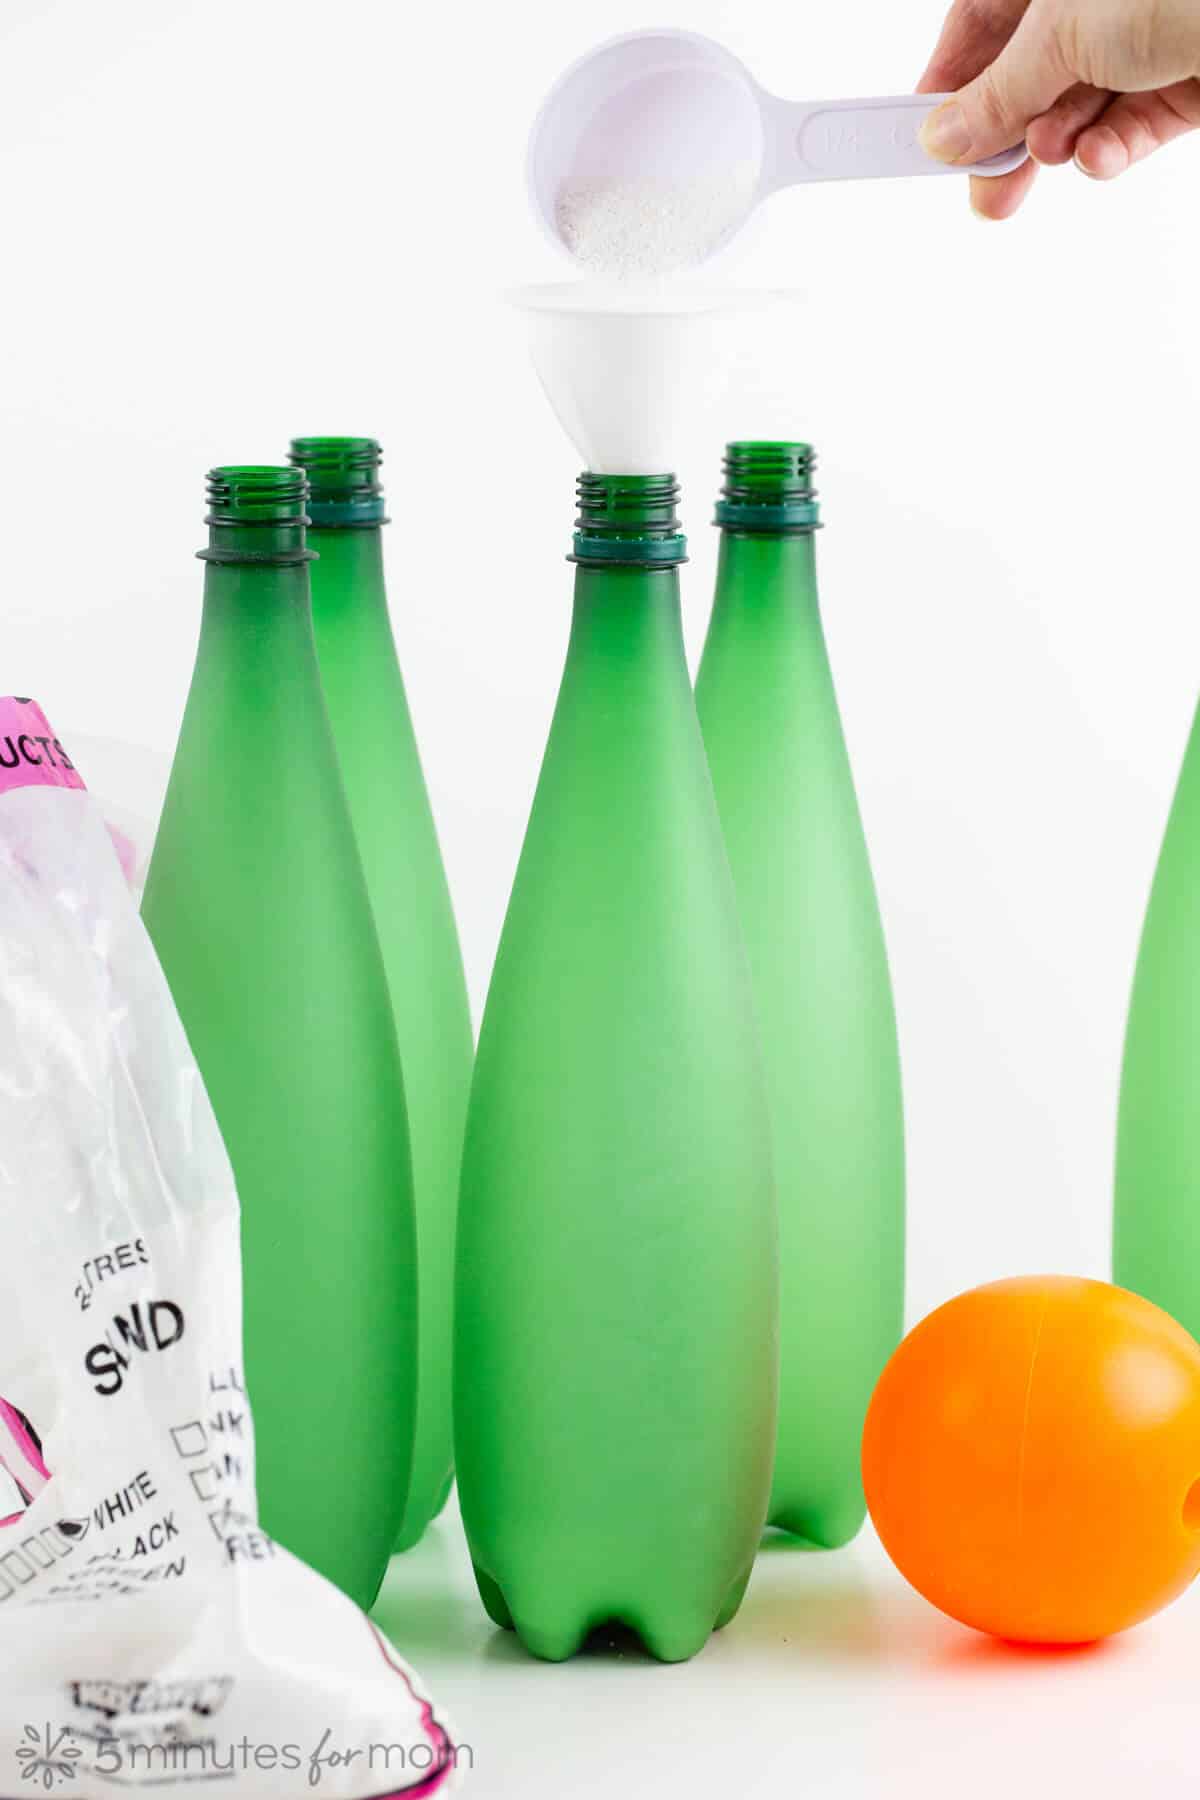
- Using a funnel (if you don't have a plastic funnel, create a simple funnel with a piece of paper,) add sand or uncooked rice to weight your bowling pins. The amount of sand or rice you use will determine how easily your bowling pins fall over, so you can adjust accordingly. We used about a 1/8 cup per bowling pin. Return lid and tighten securely.
- Expose bowling pins and balls to direct light for 1-2 hours before turning off the lights to play.
2nd Method — Fluorescent Glow in the Dark Bowling Pins
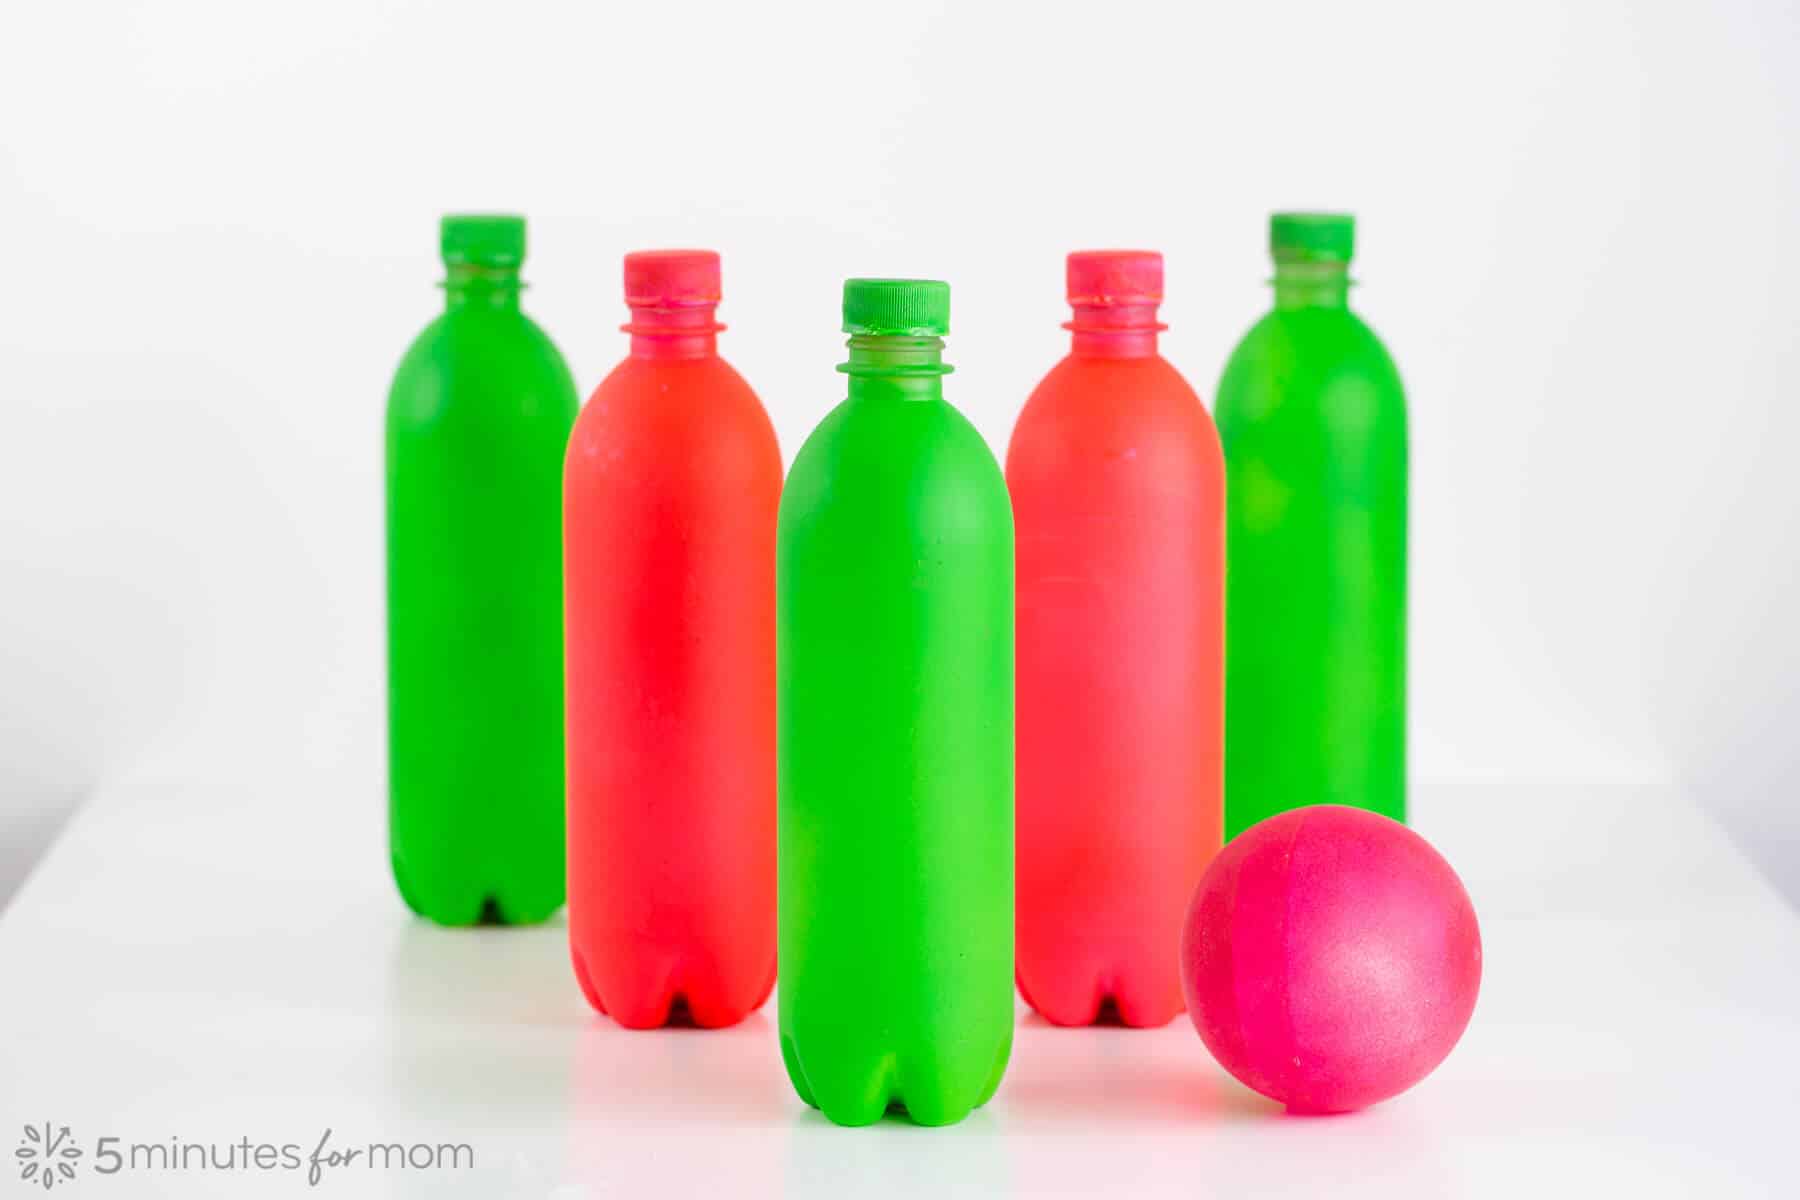
Our second method for making glow-in-the-dark bowling pins includes a second step and is a terrific way to add color to your game if you don't have the lovely green Perrier plastic bottles.
To cover basic clear or bluish toned water bottles to make them more striking, spray a couple of coats of neon or fluorescent spray paint before you add the Rust-Oleum Glow in the Dark Spray Paint.
2nd Method Supplies:
- Empty Clear Water Bottles
- Ball(s) – your choice of rubber/plastic/bouncy/tennis balls
- Testors Craft 3 oz. Aerosols in Neon Pink and Green (Find it at True Value stores and online at truevalue.com) or Rust-Oleum Imagine Neon Spray Paint or Rust-Oleum Fluorescent Spray Paint (Find these at Joann Stores and online at joann.com.)
- Rust-Oleum Imagine Glow In The Dark Spray Paint (Find it at Joann Stores and online at joann.com.)
- (optional) Testors Craft Glitter Sealer or Rust-Oleum Imagine Glitter Clear Sealer or Rust-Oleum 2X Ultra Cover Clear Spray
2nd Method Instructions:
- Remove labels and wash the plastic bottles with soapy water. To ensure the outside of the bottle is extra clean with no fingerprints or grease, you can also wash the outside of the bottle with vinegar or rubbing alcohol.
- Outside, in a well-ventilated area that is protected from over-spray, spray bottles with very light coats of fluorescent or neon paint, such as Testors Craft 3 oz. Aerosols in Neon Pink and Green or Rust-Oleum Imagine Neon Spray Paint or Rust-Oleum Fluorescent Spray Paint.
Spray each coat lightly, waiting a few minutes before adding additional coats.
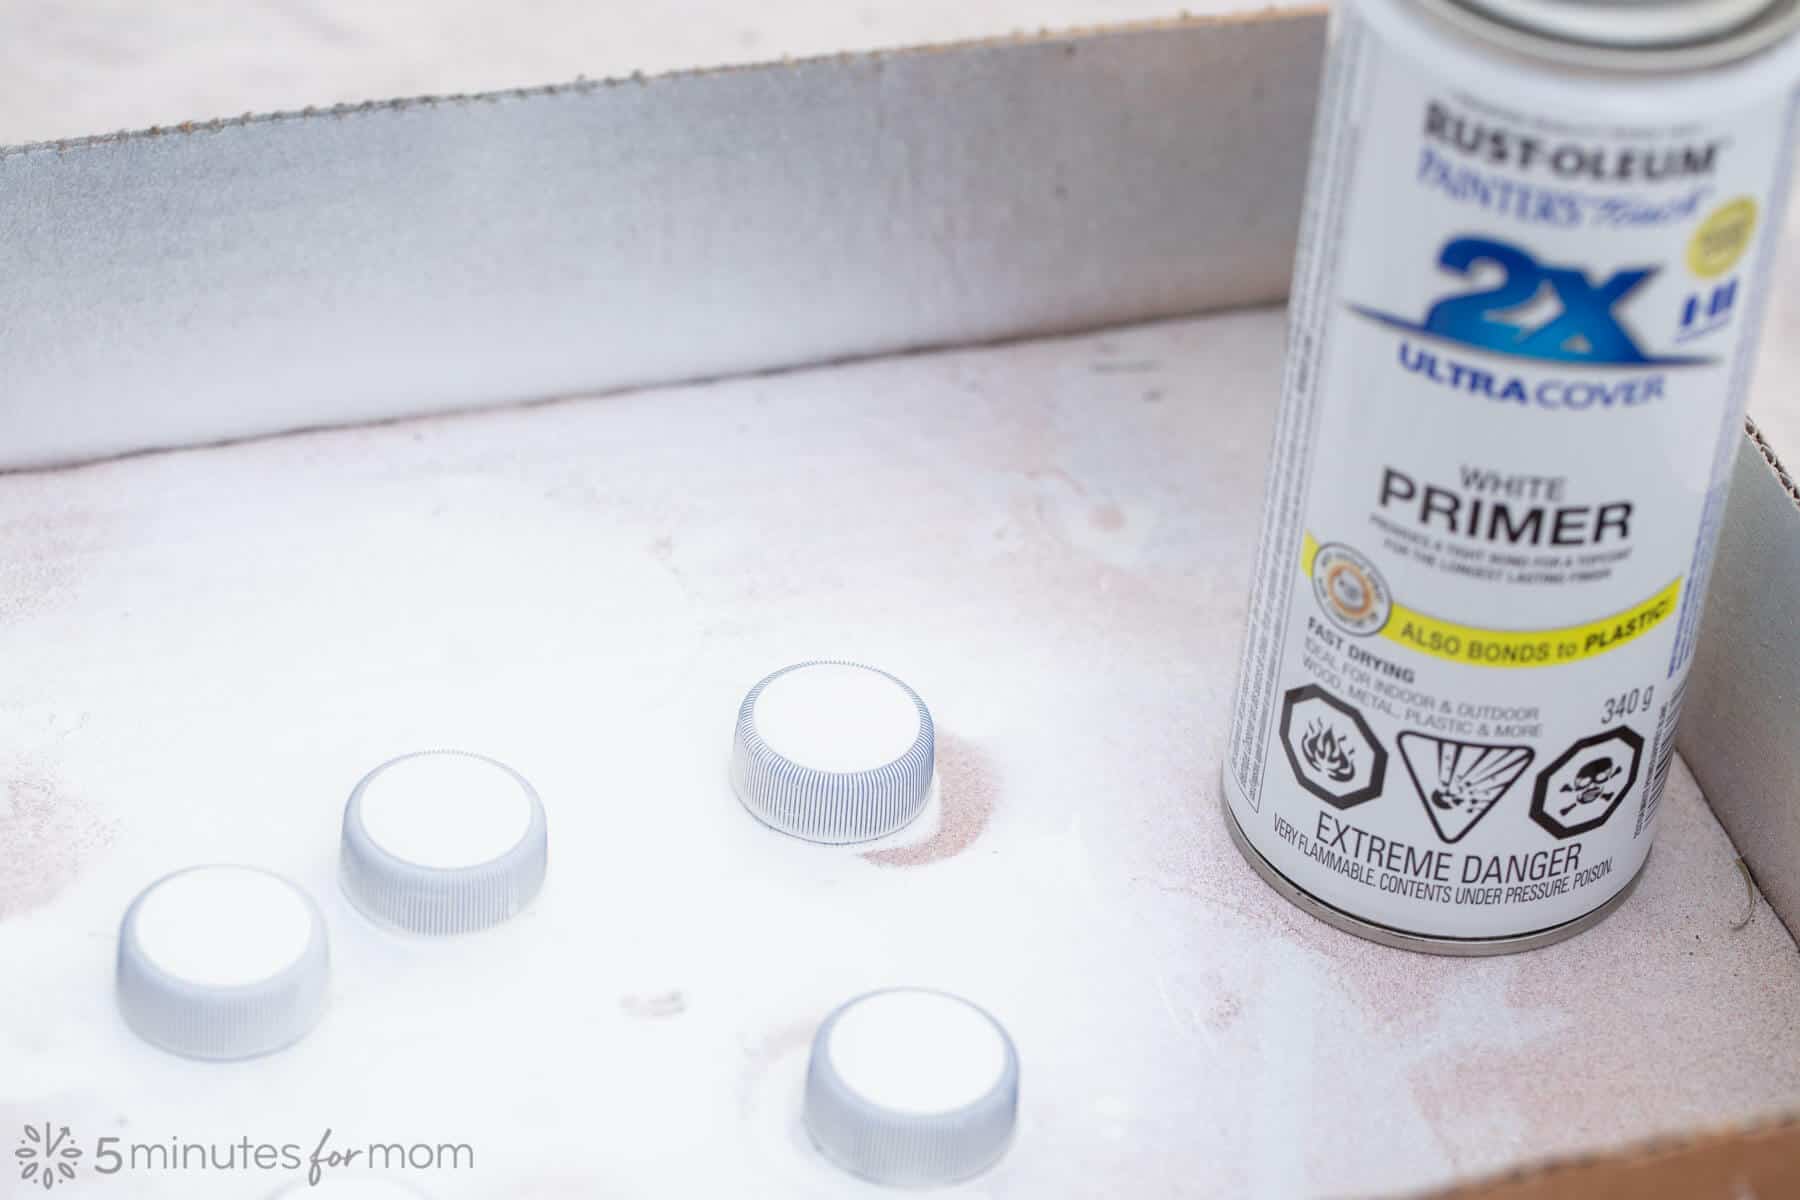
You may want to remove the bottle lids to easily hold the bottle while spray painting and then spray the lids separately. If the lids are dark or bright colors, you may want to use a white primer before painting with colors.
- After neon/fluorescent paint is dry, apply Rust-Oleum Imagine Glow In The Dark Spray Paint, once again spraying very light coats and waiting a few minutes between coats.
The more coats you apply, the brighter your bowling pins will glow.
- To make your bowling balls glow, spray with Rust-Oleum Imagine Glow In The Dark Spray Paint. We used empty glass jars from our recycling bin to hold the balls while we sprayed. Allow paint to dry enough before turning the ball to paint the underside.
- (Optional) Once glow in the dark paint is dry, apply a protective topcoat or glitter sealer such as Testors Craft Glitter Sealer or Rust-Oleum Imagine Glitter Clear Sealer or Rust-Oleum 2X Ultra Cover Clear Spray.
The glow in the dark paint can sometimes rub off slightly when playing, so applying a topcoat, especially on your bowling balls, will keep your hands and your house from getting a trace dusting of glow dust.
- Using a funnel (if you don't have a plastic funnel, create a simple funnel with a piece of paper,) add sand or uncooked rice to weight your bowling pins.
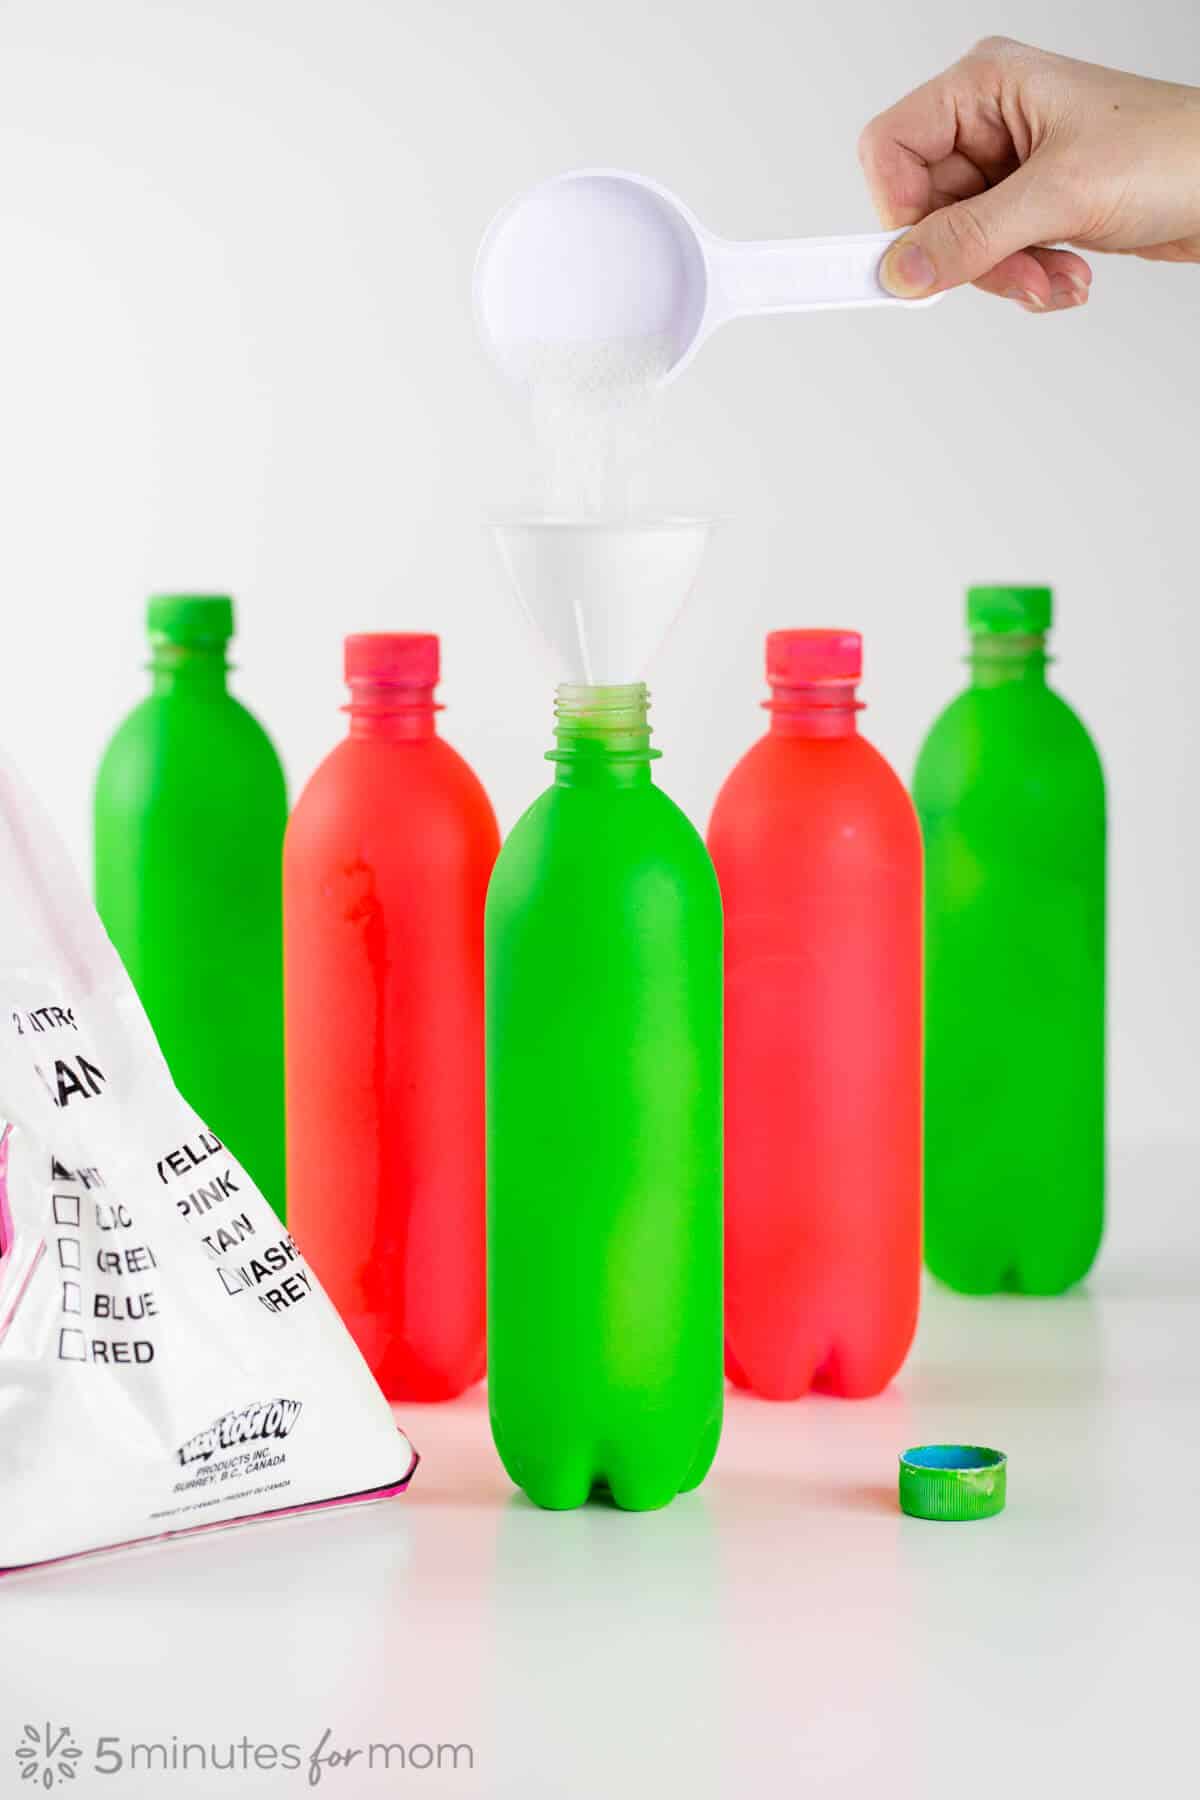
The amount of sand or rice you use will determine how easily your bowling pins fall over. So you can adjust accordingly. We used about a 1/8 cup. Return lid and tighten securely.
- Expose bowling pins and balls to direct light for 1-2 hours before turning off the lights to play.
3rd Method — Neon Glow Bowling Pins
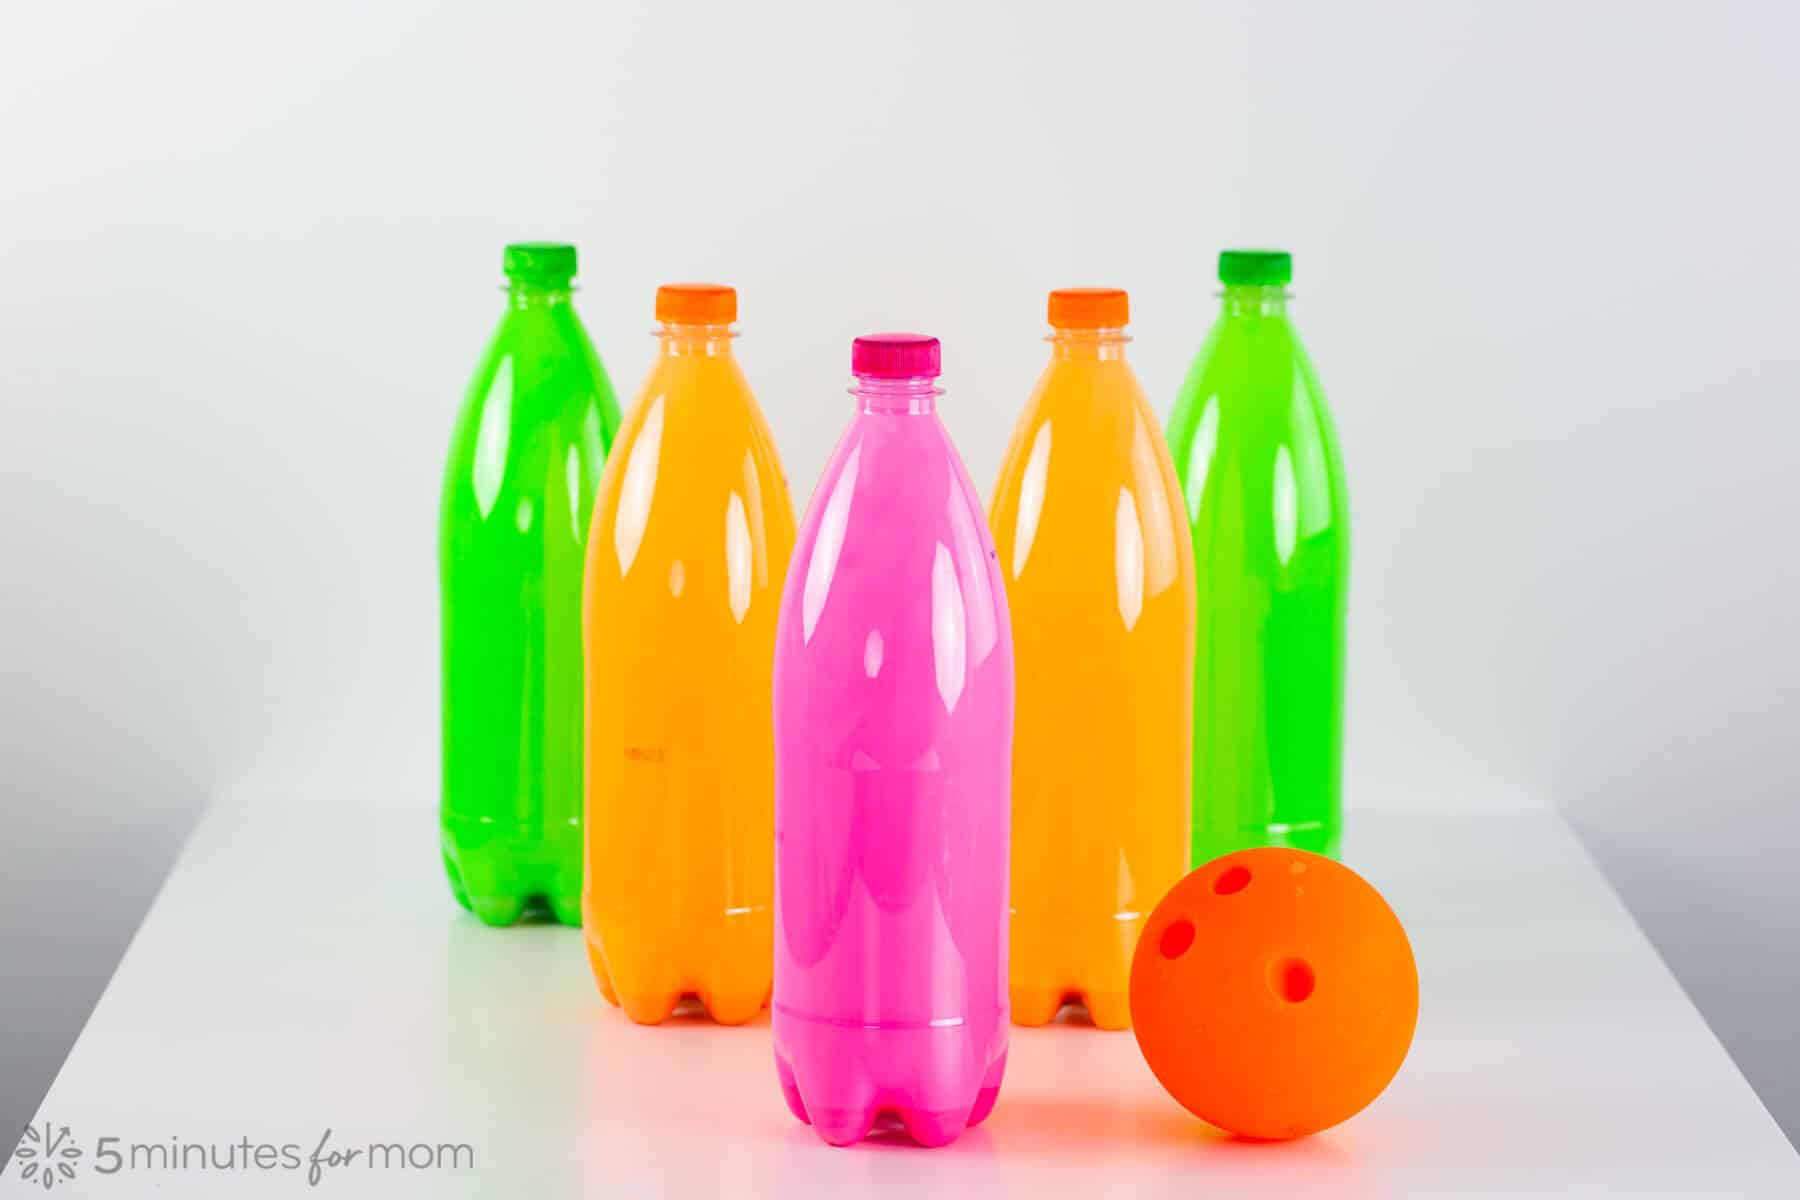
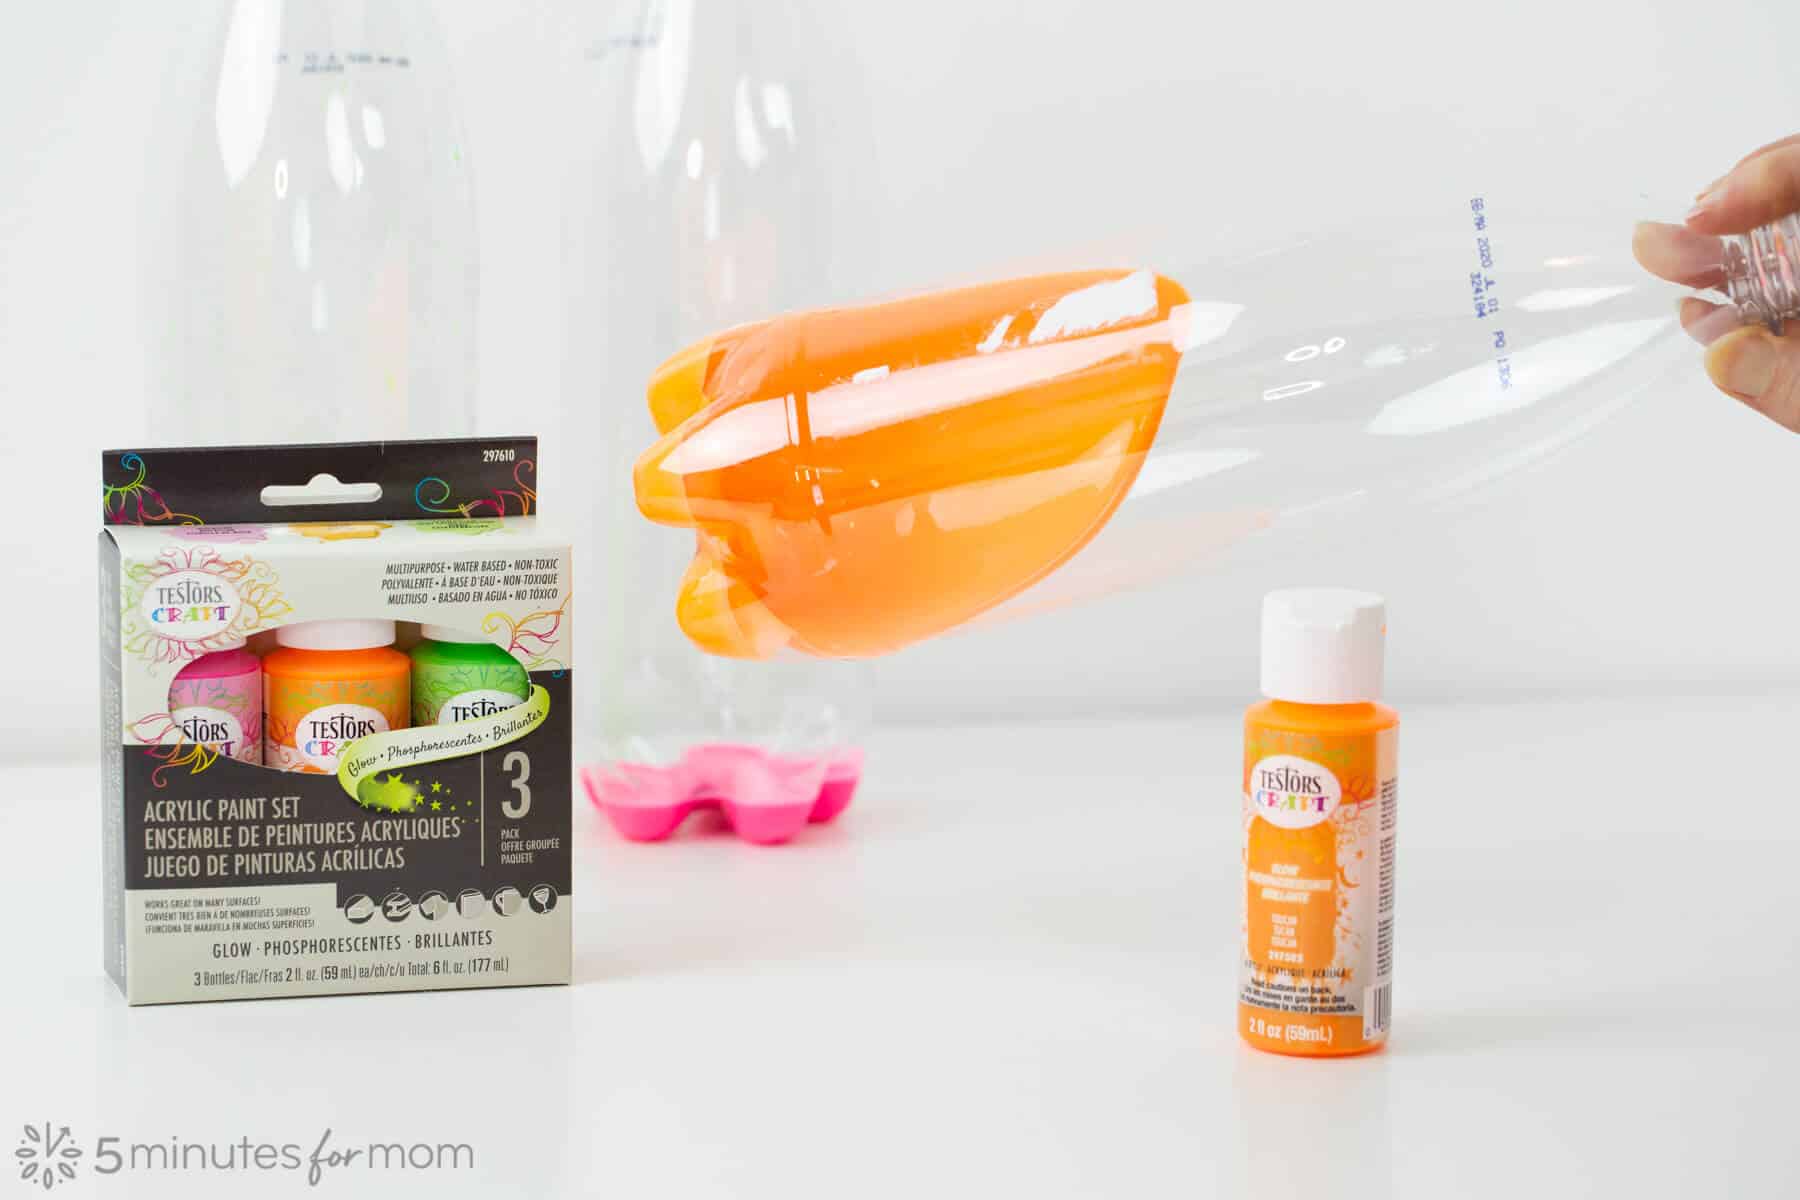
Our final method for making glow-in-the-dark bowling pins is great if you have young kids and you don't want to spray paint. With this method, young kids can get involved in painting the bowling pins by shaking the acrylic neon paint in the bottles.
Testors Craft Acrylic Glow Paints are super bright colors and make fabulous, fun bowling pins.
However, since the glow acrylic paint does not glow as much as the glow spray paint, your pins will not glow as brightly. They do work wonderfully if you are playing in the light or in a room that is not completely dark.
But if you do want your Neon Glow Bowling Pins to glow brightly, spray the Rust-Oleum on the outside of the bottles and then follow up with a clear topcoat to seal in the glow in the dark paint to keep paint dust from getting on little hands when playing.
3rd Method Supplies:
- Empty Plastic Bottles
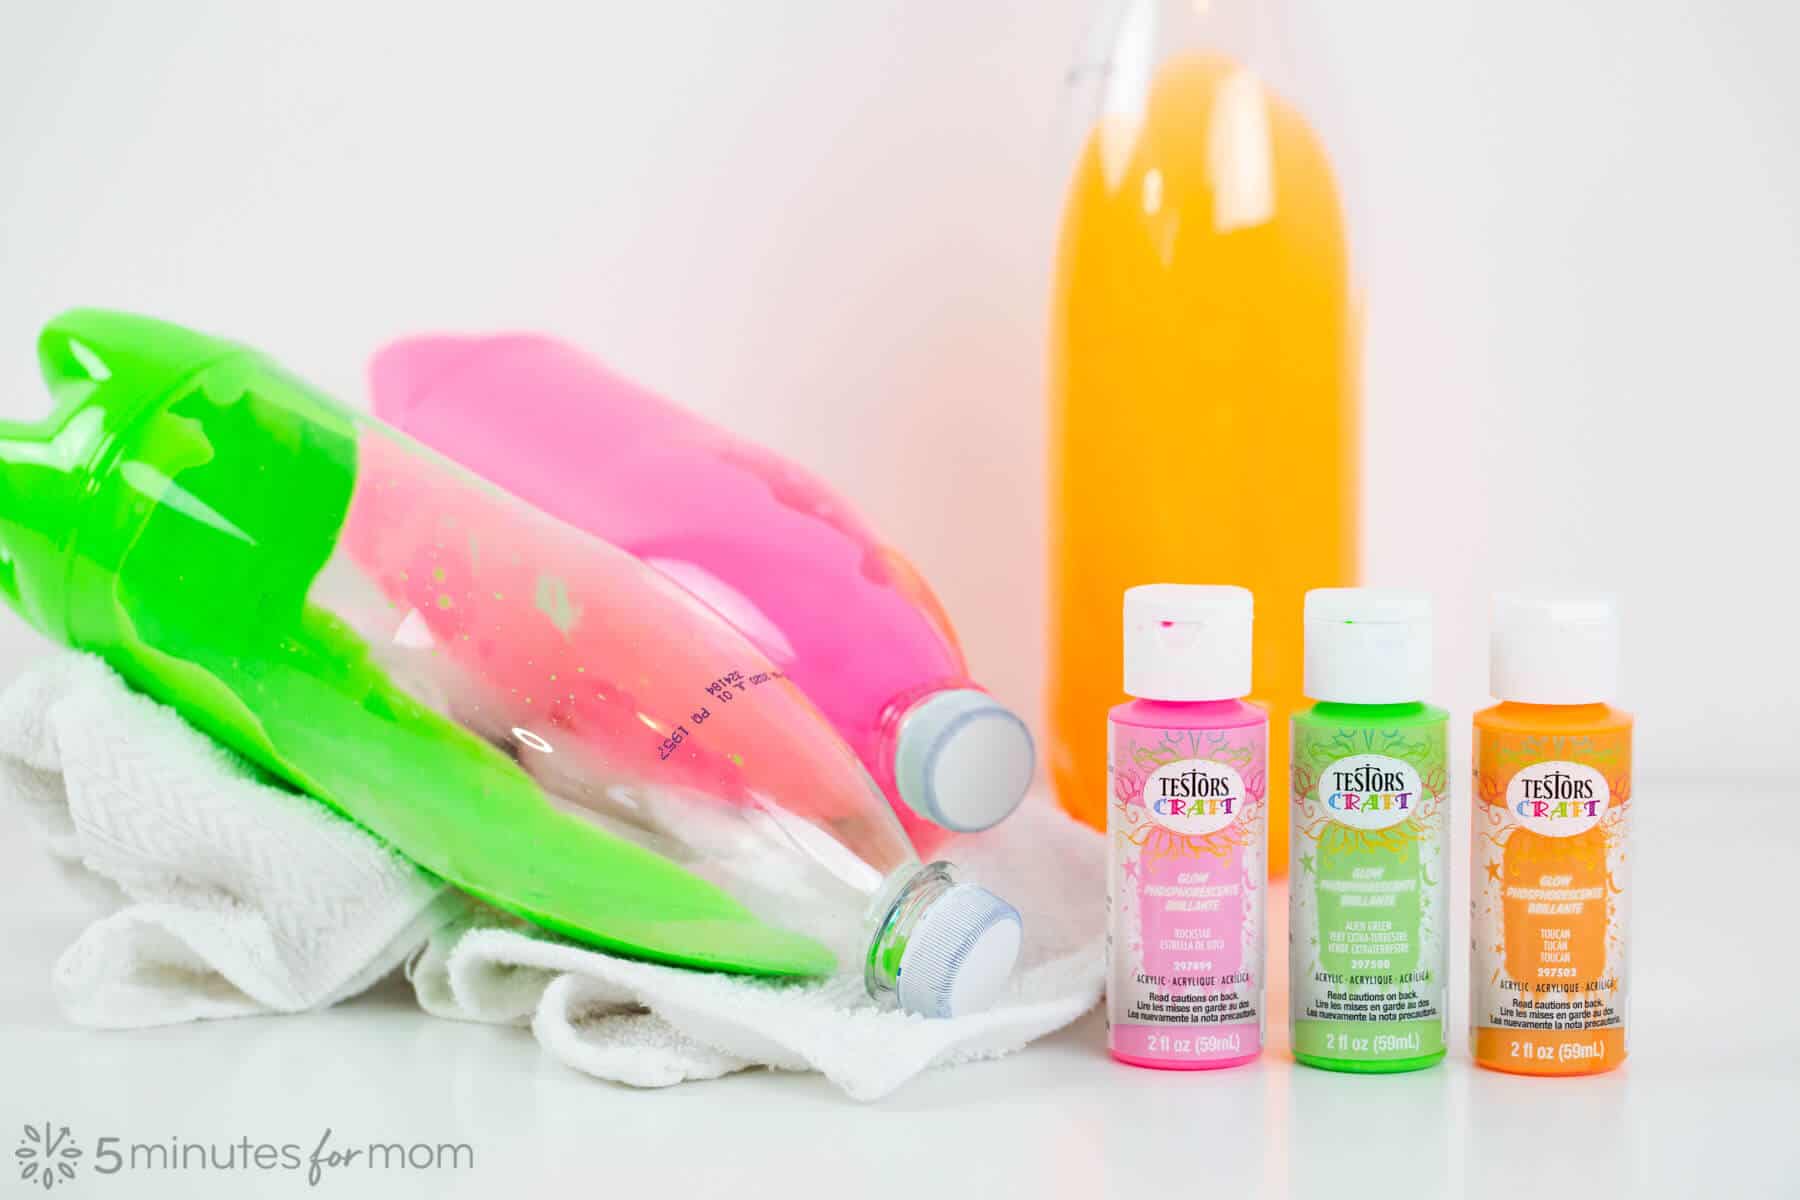
- Testors Craft Acrylic Glow Paint – Glow Colors (Rockstar, Alien Green, Toucan) 2 oz – 3 Pack Acrylic Craft Set. (You can find these in many craft stores including True Value stores and online at truevalue.com.)
- Ball(s) – your choice of rubber/plastic/bouncy balls
- (optional) Rust-Oleum Imagine Glow In The Dark Spray Paint (Find it at Joann Stores and online at joann.com.)
- (optional) Testors Craft Glitter Sealer or Rust-Oleum Imagine Glitter Clear Sealer or Rust-Oleum 2X Ultra Cover Clear Spray
3rd Method Instructions:
- Remove labels and wash the plastic bottles with soapy water. To ensure the outside of the bottle is extra clean with no fingerprints or grease, you can also wash the outside of the bottle with vinegar or rubbing alcohol.
- Pour about an ounce of paint into each bottle. You may wish to add a couple of drops of water but do so sparingly. If you thin the paint too much, it will not cling to the interior sides of the bottles.

- Securely tighten the lid on the bottle and shake and/or roll to coat the inside of the bottle. The paint inside the bottles will weight the bowling pins enough so that you do not need to add sand or uncooked rice as in the previous methods.
Eventually, the paint will settle back to the bottom of the bottle and you will need to shake or roll the bottle to once again thickly coat the sides.
Leaving the paint wet with the lid firmly on worked best for us.
We found that trying to get the paint to dry by removing the lid and leaving it overnight did not work well. The coating on the inside of the bottle became too thin and the paint at the bottom did not dry out.
So instead, just reshake or reroll the paint around the bottle and allow to charge in the light before using.
- Paint the lids of your bottles. If the lids are dark or bright colors, you may want to use a white primer before painting with colors. For the first coat of color on the lids, we painted a coat of the coordinating Testors Craft Fluorescent Acrylic Paint before applying a coat of the Testors Craft Glow Acrylic Paint.
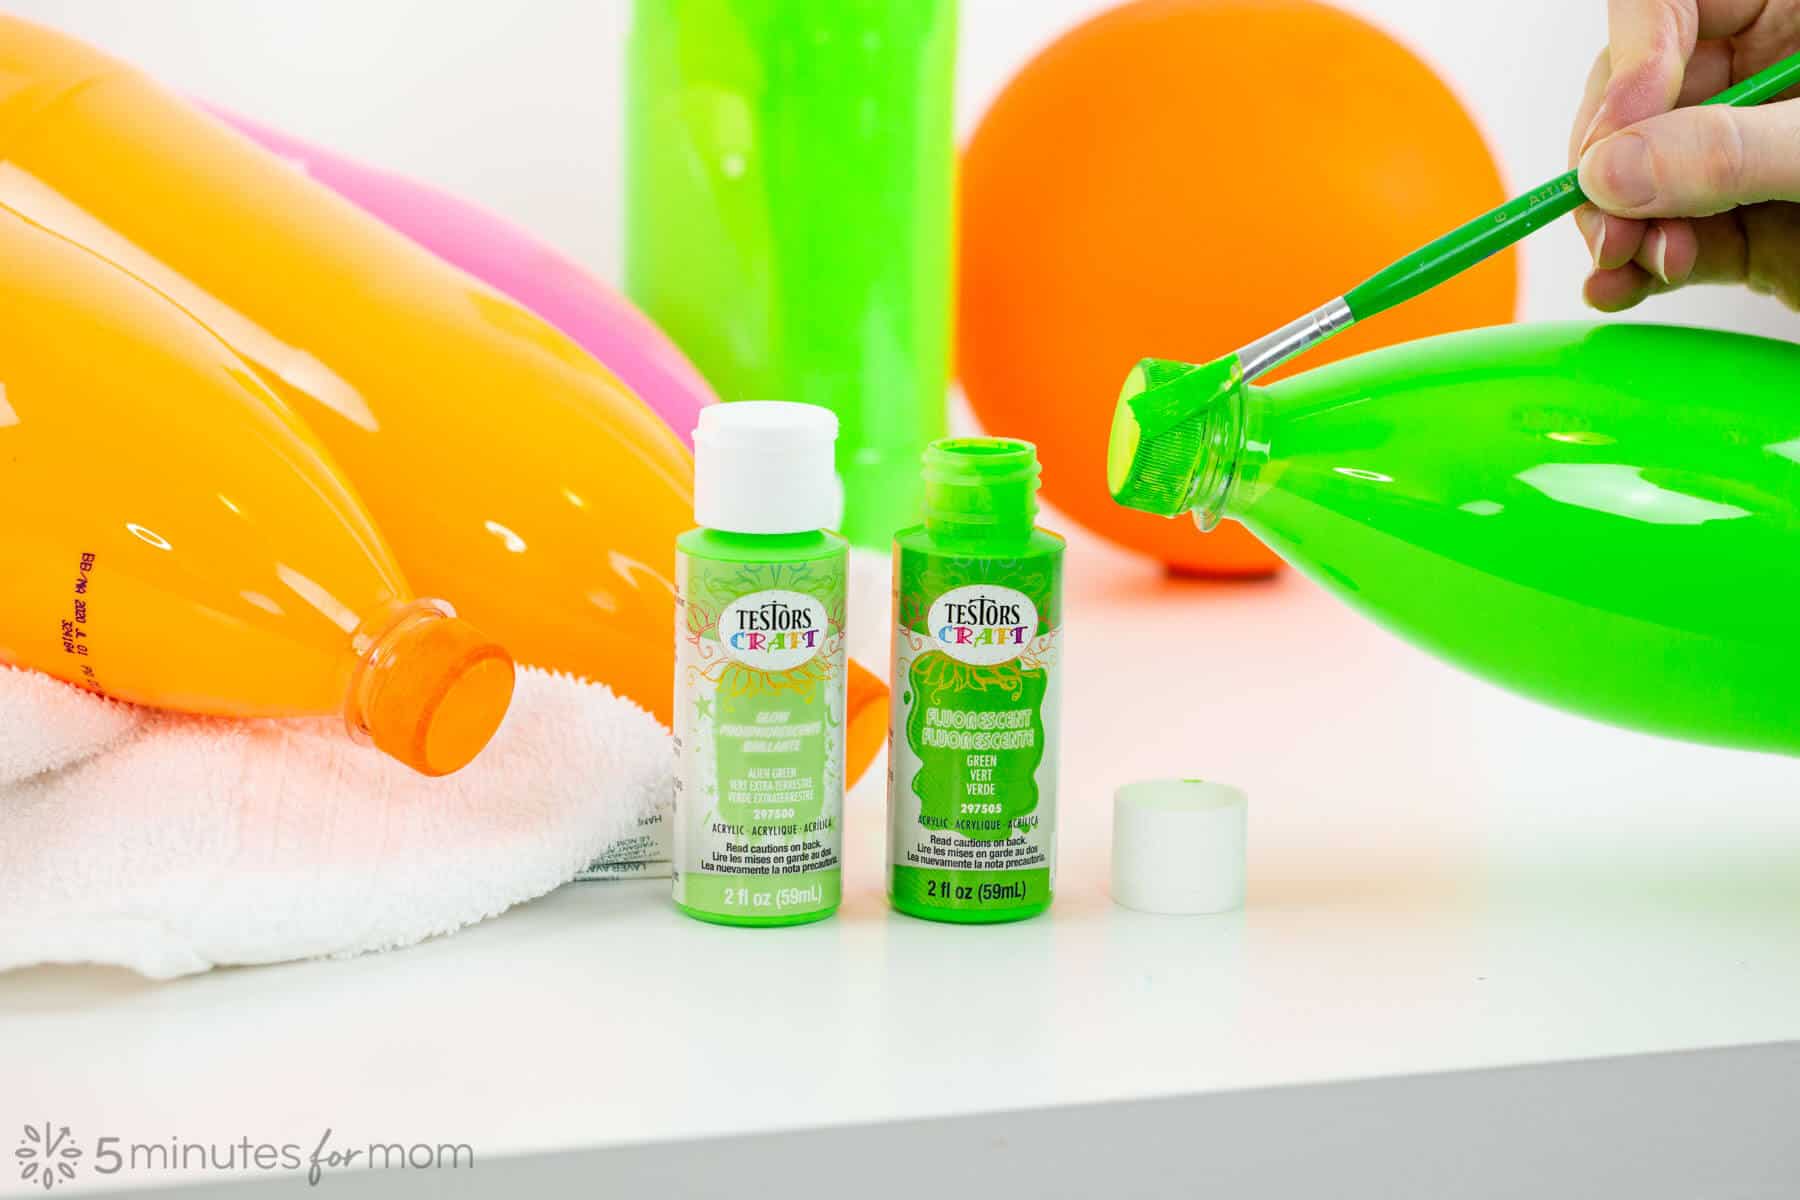
- Paint plastic balls with Testors Craft Acrylic Glow Paint. We used empty glass jars from our recycling bin to hold the balls while we painted. Allow the paint to dry enough before turning the ball to paint the underside.
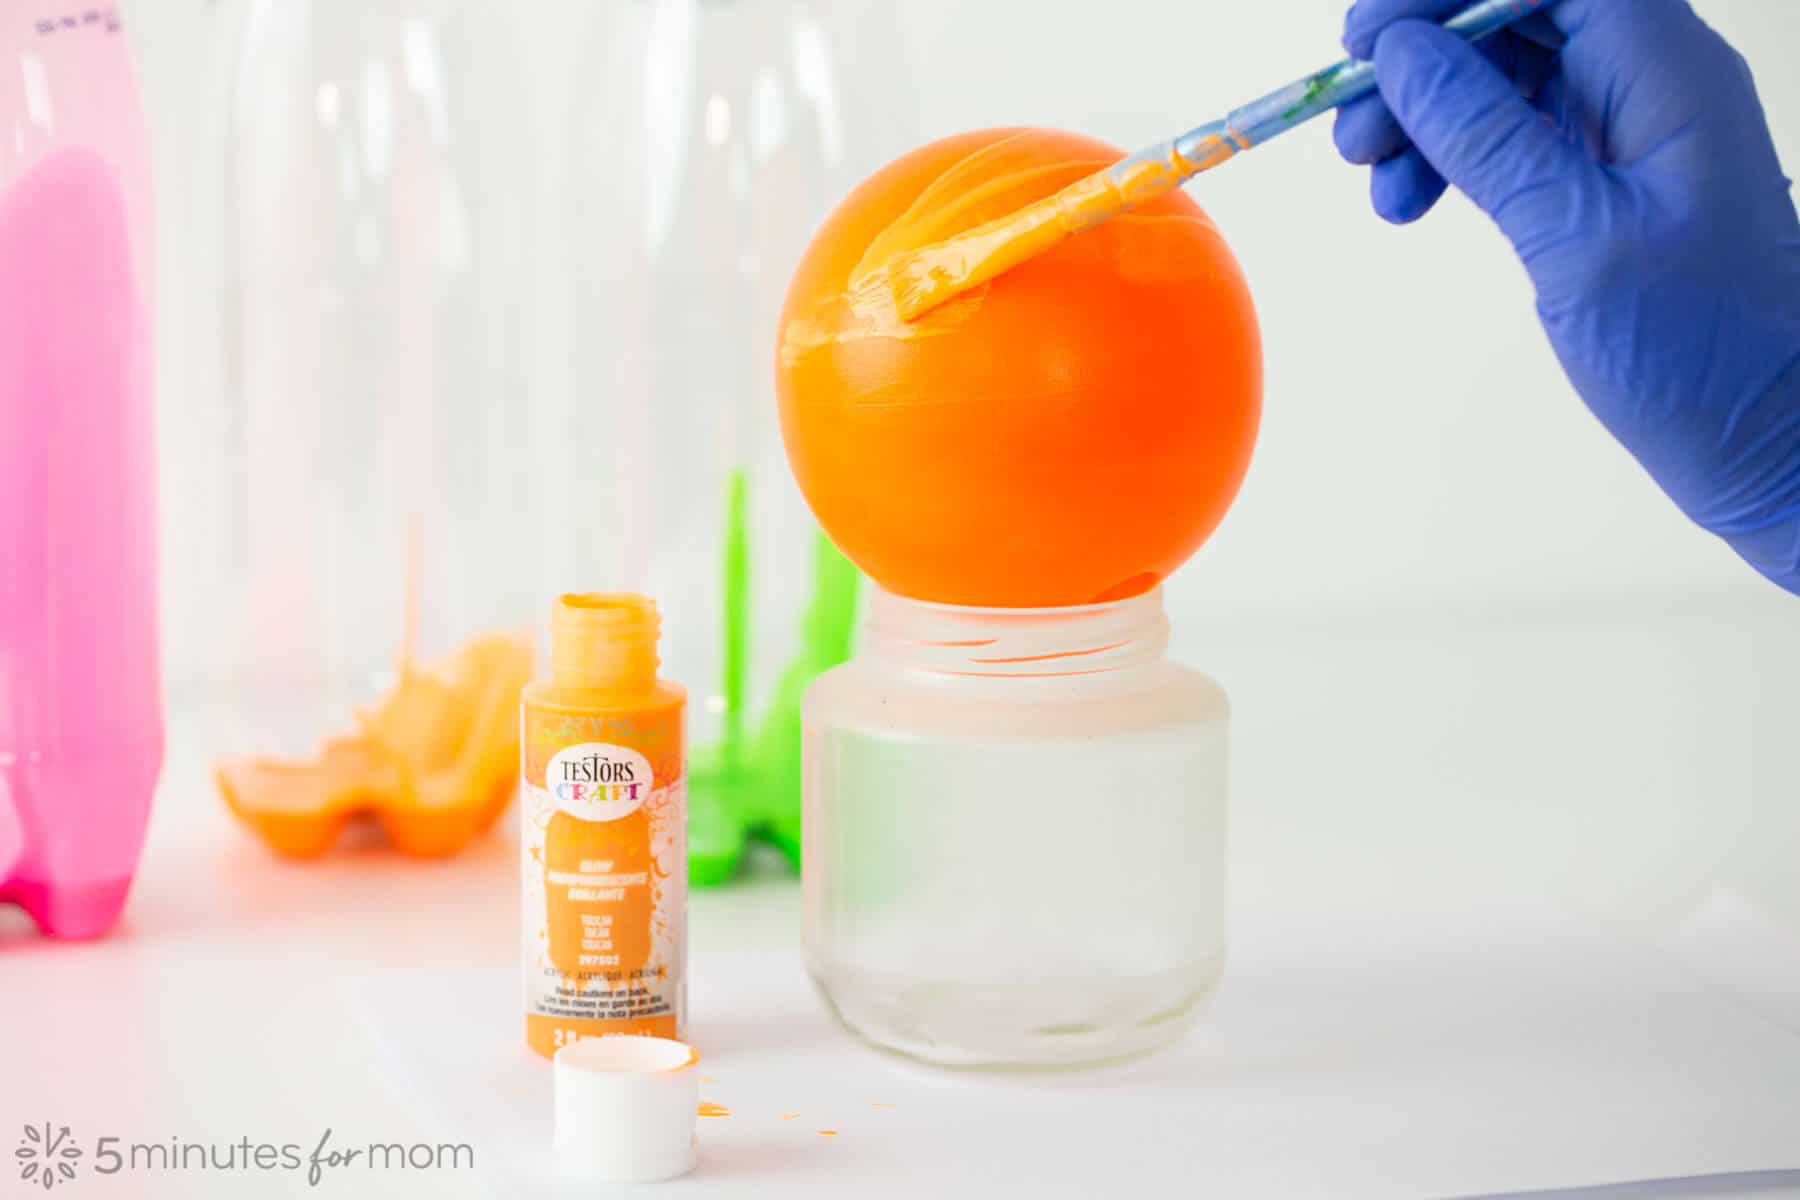
- (Optional) If you want your bowling pins and bowling balls to glow more brightly, you can spray with Rust-Oleum Imagine Glow In The Dark Spray Paint as in previous methods, spraying very light coats and waiting at 3-5 minutes between coats. The more coats you apply, the brighter your bowling pins will glow.
- (Optional) If you applied spray glow in the dark paint, once it is dry, apply a protective topcoat or a clear sealer. The glow in the dark paint can sometimes rub off slightly when playing, so applying a topcoat, especially on your bowling balls, will keep your hands and your house from getting a small dusting of glow dust.
- Expose bowling pins and balls to direct light for 1-2 hours before turning off the lights to play.

Whichever of the three methods you choose to make your DIY Glow in the Dark Bowling Set, we know you will have a blast!
Find More Fun DIY and Craft Ideas
Take a look at some of our other Testors Crafternoon projects that are perfect for Spring Break crafting:
- Painted Birdhouses
- DIY Flower Press
- How to Paint Rocks
- DIY Serving Tray
- Pallet Picture Frame
- Spray Chalk
Pin this DIY Glow in the Dark Bowling Set for Later
Disclosure: This post is sponsored, so extra thanks for reading and sharing.
Written and photographed by Janice Croze, co-founder of 5 Minutes for Mom
Talk with me: @5minutesformom and Facebook.com/5minutesformom
Pin with me at pinterest.com/5minutesformom
How to Make a Origami Bowling Pin
Source: https://www.5minutesformom.com/152066/diy-glow-in-the-dark-bowling/
0 Response to "How to Make a Origami Bowling Pin"
Post a Comment